|
|
| Seven Style builds Westfields, Caterham, Dax Rush, Luego, Robin Hood, Tiger, Locust, MK, RAW, Quantum, you name it, you're building it, share it here. |

25th June 2022, 12:20
|
 |
Senior Member
Enthusiast
|
|
Join Date: Sep 2004
Posts: 1,895
|
|
Watching with interest as it is bringing back memories of my build over 40 years ago.
As I remember the seat tub was extremely flimsy. You may want to check yours with a possible view to reinforcement!
The other thing etched into my memory, in addition to the poor steering column support, is that the handbrake mechanism on the top of the rear axle used to hit the underside of the boot floor. In the end I just cut a hole and covered it with carpet. Sigh.... those were the days.
Cheers Robin
|
25th June 2022, 17:26
|
|
Senior Member
|
|
Join Date: Nov 2012
Posts: 845
|
|
 Aching all over
Quote:
Originally Posted by MartinClan

Watching with interest as it is bringing back memories of my build over 40 years ago.
Cheers Robin
|
Yes, it's all coming back to me also. It was 40 years ago last month that I hired a dingy trailer and towed it down to Worthing behind my ex Post Office van 'Mini Traveller' with my brother in law riding shotgun. It took me four and a half years to get it on the road, but I did have four children and two cottages to renovate at the time, as well as a 60 mile round trip to Bristle each weekday. Happy Days!
The guy picking up the Marlin was due this morning at 1000 but was over an hour late due to heavy traffic, so the morning was a write off. Good fun loading up, he had a cracking anecdote about a Spartan he went to collect which was crammed with bits and full of water which he couldn't drain. His description of the sloshing activity on the motorway viewed in his mirror was hilarious.

This afternoon I jacked up the near side high enough to worm underneath and spray the prop to axle, handbrake mounting, and seat belt attachment bolts with dismantling liquid. I then removed the high-tech side exhaust mounting bracket (drilled for lightness!) which I'm sure would otherwise sooner or later have scalped me.

Whilst waiting for the penetrating liquid to do its job, I drilled out the seriously overkill number of rivets attaching the seat tub to the frame and gently levered it away from the surrounding body panels. Now, only the handbrake and belt mountings stood in the way of tub removal. Worming back underneath I found the the prop would have to come off for handbrake mounting bolt clearance. The lack of room for leverage on these defeated me, despite profanity and skinned knuckles, so I called it a day, reasonably satisfied with progress. I'm definitely not getting any younger!
Regards, Mick

|
26th June 2022, 12:49
|
|
Senior Member
|
|
Join Date: Nov 2012
Posts: 845
|
|
 Tub torture.
Following yesterday's abortive prop. bolt attempt, I today jacked her up from the rear to increase the gap so that I could improve leverage. With a meaty screwdriver through the yoke to prevent rotation, I succeeded.
Now that I could see the handbrake mounting bolts more clearly, my brain suddenly clicked into gear and I realised that disconnecting the cable at the lever end would do just as well. I had to cut the inner at the axle end and lever off the hose clip locating the outer inside the tub. Job done.
Examining the seat belt mountings more closely revealed that they were rusted solid onto a convoluted bar welded to the frame each side. OK, if I cut it just outside the outer belt mounting each side it could come out with the tub. Off with the back wheels and, unsurprisingly, there was barely room to get the angle grinder in a suitable position. A combination of cuts, cold chiselling, parting of digestive biscuit strength welds, and work hardening with the ends Mole Gripped finally achieved the necessary clearance. A few minutes wrestling had the tub free at last.

The bar can be seen looping around the inside of the tunnel. I can't remember how Tim Dutton expected builders to anchor the lower mounts, clearly the rather flimsy tub wouldn't be man enough. I'll dig out the photo' of my 80s solution and post it.
Regards, Mick
|
26th June 2022, 13:30
|
|
Senior Member
|
|
Join Date: Nov 2012
Posts: 845
|
|
Low tech, picture of prints!
I found the picture mentioned above, as well as the one I took at TDW's place. In the background can be seen a completed Sierra, a Melos and another Phaeton, both awaiting pick-up.

This is the bolt on frame I fabricated to locate the bottom seat belt mountings. It was 1.5" steel angle welded together. The LH holes (as you look at it) coincided with the gearbox mounting, the centre ones bolted to a cross member, and the RH four are for the belts. I'll definitely do the same again.
Regards, Mick
|
26th June 2022, 14:41
|
|
Senior Member
|
|
Join Date: Nov 2012
Posts: 845
|
|
 D'Oh!
D'Oh!
Quote:
Originally Posted by Mick O'Malley
I can't remember how Tim Dutton expected builders to anchor the lower mounts...
|
I just went back down to the cave and remembered when I looked at the frame: there are four nuts welded to a cross member, which is way too far forward for a realistic lap portion of a belt. Looking at my frame picture, its middle bar was bolted to these.

I'm glad I didn't use them as intended, although I doubt any reasonably diligent MOT tester would OK them...
Regards, Mick |
27th June 2022, 09:52
|
 |
Senior Member
Enthusiast
|
|
Join Date: Mar 2005
Posts: 3,079
|
|
Hi Mick,
Following your updates with interest. It is fascinating to see how flimsy these early kit cars were. I guess they were built for lightness and low cost. By comparison my Sabre has 4 inch square chassis rails and is built like a battleship but there again John Barlow only sold about 150 kits partly, I suspect, due to the cost of the kit.
Looking forward to the rebuild.
Cheers, Peter
|
28th June 2022, 10:37
|
|
Senior Member
|
|
Join Date: Nov 2012
Posts: 845
|
|
 Panel saw to the rescue
Thanks for your interest Robin and Peter, most welcome!
Today I set about taking out the footwell/front bulkhead moulding. A combination of drilling rivets and chiselling off the less accessible heads soon had it free of the frame, apart from the easily released hydraulic pipe to master cylinder nuts. Despite about 20 minutes of wrestling and head scratching, I couldn't manoeuvre it to a position where it looked even likely to come out, the inward taper of the front of the frame defeating me. I think it must have been put in with KY Jelly and a couple of biffers jumping on it. OK, so out with the trusty go-to panel saw and the job was done  . .

I can now bolt the engine and gearbox together, dangle them from the crane and work out mountings.

I'm still undecided whether it's worth taking off the back body. The frame is very sound, and as long as the fuel tank doesn't leak I think leaving well alone is the better option. It looks as though the tank is the third to be fitted, the hole in the back panel looking very Mk1 or 2 Cortina (as TDW intended).
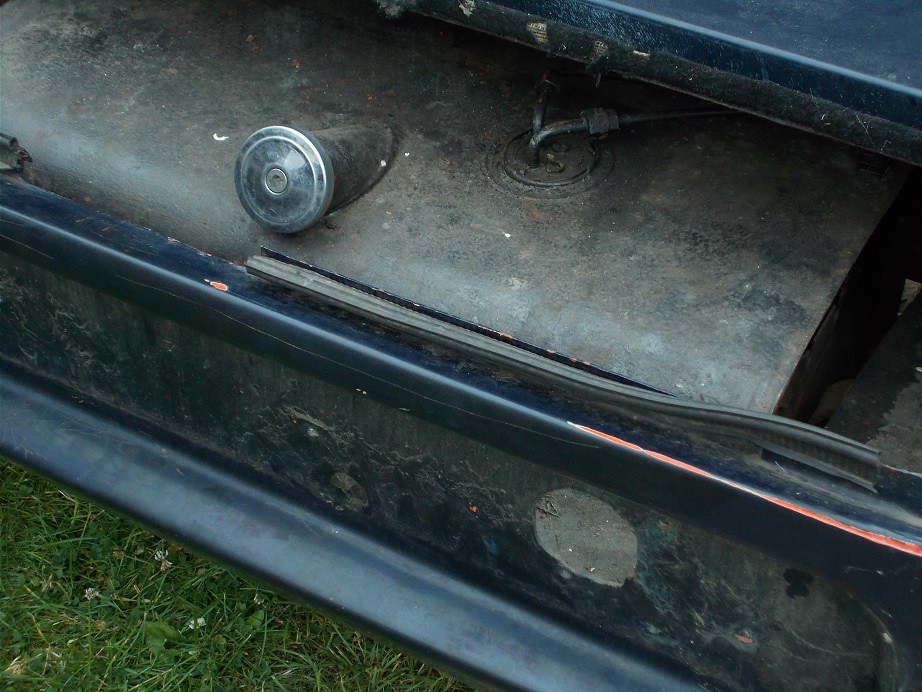
The glassed in opening next to the nearside wing hints at Mini Van/Traveller or maybe estate versions of the above. Who knows? My original Phaeton had the saloon tank with a stub welded on top to have the cap in the Spitfire position.

Regards, Mick
|
29th June 2022, 12:33
|
|
Senior Member
|
|
Join Date: Nov 2012
Posts: 845
|
|
This morning's sortie down to the sunlit cave saw me wheeling the skeletal Phaeton out of the way, dragging the gearbox from the shed, erecting the crane, and releasing the engine from its home of late - my sack truck.

I put a block under the rear of the sump so that the engine sloped slightly down, roped the 'box to the crane and offered it up. It was reluctant to slide the last few centimetres home, despite rotating the output shaft, so I removed the cover and driven plates so that only the first motion shaft needed to engage. That did the trick. Once the connecting bolts were tight I roped the unit to the crane and parked it to one side, allowing me to wheel the skeleton back.

Happy with completing another small step, and wishing to quit while I was ahead, I decided to leave the offering up for another day.
Regards, Mick
|
|
Currently Active Users Viewing This Thread: 3 (0 members and 3 guests)
|
|
|
 Posting Rules
|
You may not post new threads
You may not post replies
You may not post attachments
You may not edit your posts
HTML code is Off
|
|
|
All times are GMT +0. The time now is 13:22.
|


 Hybrid Mode
