|
|
| Marlin Sportster, Cabrio, Berlinetta and Roadster builds Enthused or Confused about your vintage Marlin build? Ask away here or show off your build. |

5th February 2015, 20:35
|
|
Senior Member
|
|
Join Date: Dec 2013
Location: Sunny Cumbria
Posts: 470
|
|
 I forgot this should have been posted on the first Feb.
My updated progress chart to the end of January. Just crept over 60% overall.
 |
5th February 2015, 22:35
|
|
Senior Member
Enthusiast
|
|
Join Date: Jan 2007
Posts: 932
|
|
Quote:
Originally Posted by 8 Valve Ed

Hi, the Mini based trike is really nice, I saw it on Sunday and had a really good look. I am still digging trying to find it's origins. It's purely a track trike, it would originally have been use alongside sidecar outfits. Once it's back in running condition it will be racing in the British Historic Championship alongside three wheeled Morgans, other three wheel specials and historic sidecar outfits.
This is what they get up to... The Morgan is running on Methanol, the Berkly is a Mini based special. One of my better snaps!
 |
With Bill Tuer at the controls and Maggie his passenger there is nothing that touches this Morgan - he is completely without fear - and Maggie must be too to be his passenger! He'll pass on either side, and go off the track and do it on the grass if he has to. He is just brilliant to watch, and you can not see Maggie as the passenger as she gets down so low! Just fabulous to watch at our local Cadwell VSCC meets. |
6th February 2015, 06:26
|
|
Senior Member
|
|
Join Date: Dec 2013
Location: Sunny Cumbria
Posts: 470
|
|
|
7th February 2015, 22:09
|
|
Senior Member
|
|
Join Date: Dec 2013
Location: Sunny Cumbria
Posts: 470
|
|
The Engine
Today was spent on the engine, cleaning and preparing. We fitted the crank and fitted #1 and 2 pistons, TWICE!!! Hope you guys find this funny... I fitted them in # 7 and 8 bores... Realising my mistake, with a rather red  face, we pulled them and re-fitted them in the correct bores. 
At least I realised before all 8 were in place.  At least it was an easy mistake to rectify. 
After that we retired to the house. Enough excitement for the day, I will take some pix tomorrow. We decided one problem was we don't have a bench to put things on ready to assemble, tomorrow we plan to make a little table to put things like the pistons and tools so we can see them and don't spend more time looking for them than using them.
Michael, my son remarked that it will be great when we can actually ride in the car and enjoy days like today exploring the lanes and enjoying using the car on the beautiful days we get here. The sunset was amazing this evening, the sky was bright red for ages and it reflected off many of the surrounding houses windows.
I am glad I held off assembling the engine until Michael could be involved, he is only 14 and this is the first engine he has helped assemble. He has torqued up all the bolts and has a better understanding of what goes on in the innards of an engine. I hope to finish the assembly of the short motor tomorrow, fitting the remaining 6 piston assemblies (in the correct bores... ) and fit the the cam and timing gear.

|
9th February 2015, 18:15
|
|
Senior Member
|
|
Join Date: Dec 2013
Location: Sunny Cumbria
Posts: 470
|
|
In an earlier post Paul L kindly provided a link to a very interesting technique for creating hinged panels, doors, bonnet and boot lid etc.
http://www.ffcars.com/forums/2642315-post17.html
Basically it uses a tubular frame, attached to the hinges and the catch/lock, the frame has a sheet aluminium flange which is dressed to the tube and riveted on. The flange is then adjusted to fit the aperture, then clad with a single outer skin. This method allows the frame to be adjusted exactly to fit the aperture both for size and alignment before the skin is attached to the frame. It also allows for secret hinges and keeps fasteners out of sight, neat idea.
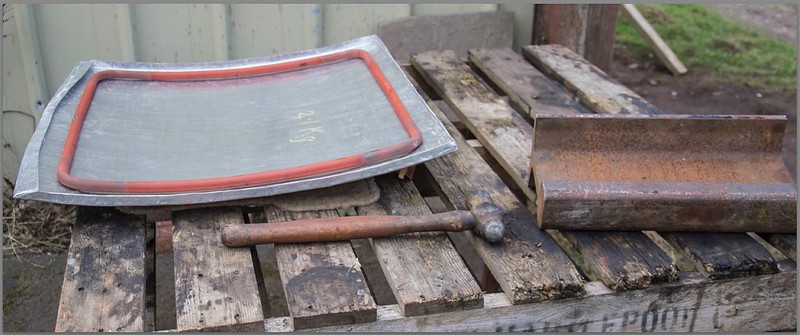
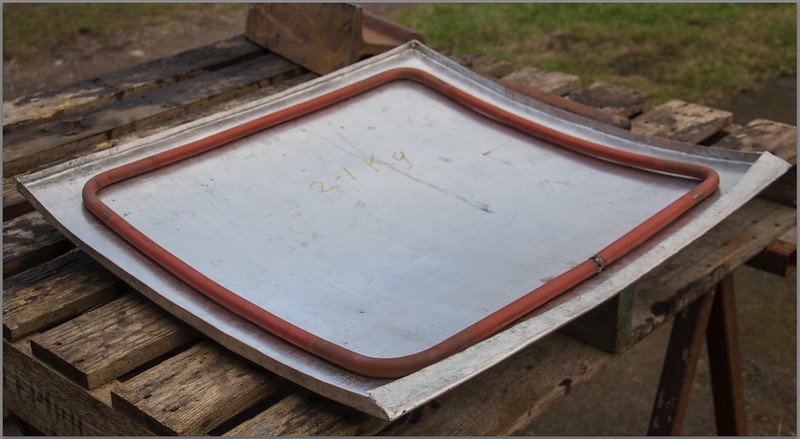
I finally obtained some suitable tube over the weekend. It's nominal bore 'black iron' (In reality, red!) tube, in order to minimise weight and cost I chose 3/8" nominal bore tube, this is about 12mm bore and 17mm o/d. My challenge was to bend it to a suitably tight radius without it kinking or collapsing. Today I overcame that obstacle when I tried my large blow lamp. It was man enough to heat the tube to red hot reasonably quickly. Once red hot it bent fairly easily and with good grace, no signs of kinking or other silliness.
Here are some pix of the frame laid on the underside of the boot lid. It isn't a perfect match for the curves but I believe close enough to get the job done. I have started creating the first hinge and I am very pleased with how it's shaping up. Hopefully tomorrow I will have something to show.

|
5th February 2015, 20:23
|
 |
Senior Member
Enthusiast
|
|
Join Date: Feb 2005
Location: Hampshire
Posts: 2,497
|
|
I like your bubble sculpture  Looking good  |
5th February 2015, 20:26
|
|
Senior Member
|
|
Join Date: Dec 2013
Location: Sunny Cumbria
Posts: 470
|
|
Thanks Patrick, I have to admit I was rather taken with it myself. Bit like a Christmas tree, I liked it better because it wasn't a leak!
|
20th February 2015, 16:45
|
|
Senior Member
|
|
Join Date: Dec 2013
Location: Sunny Cumbria
Posts: 470
|
|
Thanks for that, I have now up-loaded it to a new You-Tube account.
So here is the URL of the video of my engine spinning, on the end of a very strong Hilt Drill, it took some holding I can tell you. :roll eyes:
https://www.youtube.com/watch?v=Ik4h...ature=youtu.be
Well that seems to work, if there's a problem please let me know. This is my first attempt at such high tech stuff. The upload to You Tube was much easier than to Flicker.
Last edited by 8 Valve Ed; 20th February 2015 at 16:52..
Reason: Added comment.
|
20th February 2015, 20:53
|
 |
Senior Member
Enthusiast
|
|
Join Date: Sep 2005
Location: Northampton, UK
Posts: 1,891
|
|
Quote:
Originally Posted by 8 Valve Ed
Thanks Robin, seems a very comprehensive site, Having now seen the prices of the air riveters, I now know why I use a hand riveter!!! They seem to start at about £350... Way outside my budget.
|
They don't have to be that expensive:
http://www.ebay.co.uk/itm/Air-Hydrau...item4ae4fbce99
That's identical to the one I have, which works very well. Made short work of the floor pans in Vikki. |
20th February 2015, 21:02
|
|
Senior Member
|
|
Join Date: Dec 2013
Location: Sunny Cumbria
Posts: 470
|
|
That's within budget! Thank you, I am sure for the limited amount of riveting I do it would be quite good enough, no need to spend a fortune.
|
22nd February 2015, 17:44
|
|
Senior Member
|
|
Join Date: Dec 2013
Location: Sunny Cumbria
Posts: 470
|
|
Spun the engine over on it's starter today, the oil appeared at the rockers immediately.  |
20th February 2015, 21:30
|
|
Junior Member
|
|
Join Date: Nov 2013
Posts: 7
|
|
Just watched your video of the engine turning over. Just be careful that you have got oil pressure when you start the engine for real, as turning it over will have moved the petroleum jelly from the pump but maybe not enough to keep it primed until you start it.
|
20th February 2015, 21:45
|
|
Senior Member
|
|
Join Date: Dec 2013
Location: Sunny Cumbria
Posts: 470
|
|
I will check for sure! I had a devil of a job getting the oil pump primed. I packed it with petroleum jelly twice but no dice. I tried all sorts of tricks and in the end the Dyson won! I retrieved the old oil filter from a thicket where I had slung it, I modded the filter base, cleaned it up and connected it to the Dyson, it sucked the oil up without even spinning the engine, it worked a treat.
The old filter base is now in my 'special tools' box. So easy, although cleaning a quarter of a litre of oil out of the Dyson was a challenge! At least my carpet won't go rusty!!! If I do have to use it again I will use an intermediary clear tub to catch the oil before it get's to the Dyson.
Thanks for reminding me anyway. I am hoping to have it started next week, the fuel lines are going in now.
It's a long time since I played with these engines, must have been about 1985 or 86 when I had my last P6. |
20th February 2015, 22:04
|
|
Junior Member
|
|
Join Date: Nov 2013
Posts: 7
|
|
Years ago I was trying to get oil pressure on a Rover V8. I would pack the pump with vaseline and each time I started the engine the pressure was good for a few seconds then nothing. It turned out after several attempts that I had wired the electrical oil pressure gauge to only be live when the starter was live! I was getting some funny looks in the chemist when I kept going back for yet more vaseline!!
|
20th February 2015, 22:25
|
|
Senior Member
|
|
Join Date: Dec 2013
Location: Sunny Cumbria
Posts: 470
|
|
Very good! LOL
At least you can still get Vaseline, I have tried to get Paraffin recently and people look at you with a glazed expression? Nobody seems to stock it any more. I have asked everywhere without success. I don't like using petrol for washing off and the Gunk type solutions don't seem to have the 'bite' they used to have, more like pink soapy water. In fact my tub of washing off stuff froze the other day and I filtered off a load of ice, it had formed sheets in the solution.
|
25th February 2015, 20:16
|
 |
Senior Member
Enthusiast
|
|
Join Date: Mar 2005
Posts: 3,079
|
|
Quote:
Originally Posted by 8 Valve Ed
I have tried to get Paraffin recently and people look at you with a glazed expression? Nobody seems to stock it any more. I have asked everywhere without success.
|
Try B&Q, Homebase or your local garden centre as they still make paraffin heaters for greenhouses. You may have to look in the gardening section of B&Q.
http://www.diy.com/departments/bq-pa.../257116_BQ.prd |
25th February 2015, 22:27
|
|
Senior Member
|
|
Join Date: Dec 2013
Location: Sunny Cumbria
Posts: 470
|
|
Thanks for that suggestion Peter, I will take a look when I go to town.
You may be able to help with my next question too. I am starting to think about my grill. Probably Paul L's adventures have rubbed off on me. As part of the 'package' when I collected the Berlinetta, came a little pack of kinky wires, 45 of them I think, each wire has 20 kinks at 19mm centres.
This is for my grill. Stupidly I assumed the wires were stainless but no, they are 2.4mm aluminium welding rods, with kinks. I like the light weight aspect but have a feeling it's going to corrode like crazy and be pretty fragile. Stainless would have been much better, not sure I feel like forming 500 kinks in stainless welding rods. Perhaps a job for Michael... I suppose they could be anodised?
My question is what material is the frame, I am assuming it's aluminium, but what thickness and width? I am guessing it's 2mm thick but I could be wrong it may be 3mm? The width has to be the depth of the aperture plus 5mm plus 2mm. According to the assembly manual the surround is supposed to protrude 2mm to the front of the cowl and have 5mm behind, inside. I guess what I don't know is the thickness of the metal.

I had a bit better day today, at least I didn't drill any more holes in the rad... :roll eyes: I finished up mounting the rad and the front cowl/nose cone. I had a problem with access there and ended up welding bolts into strips of steel which will be glued into the rad cowl which is fibreglass. Otherwise there was no way of attaching the cowl to the chassis.
The fan belt I ordered is too short and too thick,  so it's back to the drawing board on that. At least I know what it isn't! LOL
I connected the fuel line to the engine, failed to get any ignition HT leads, the originals are shot. Will try again tomorrow but it's looking bleak for starting the engine this weekend without the leads. Everything else is falling into place, I am adapting the old Cortina accelerate pedal to mount inside the car, I never understood why it was in an ugly fibreglass compartment under the bonnet. Difficult to think of a more complicated, lousy solution? I can't find the accelerator cable, it may have been junk and been disposed of together with a lot of other rubbish items from the car.
Just had a hunch, been up in the loft and found two really nice smooth brand new Shimao bike gear cables, nicely long enough and with the correct ends! Great result! :-)
Well once again the excitement of the day has made me very tired, I will hit the Z's before I fall asleep on the keyboard. 
|
24th February 2015, 19:46
|
|
Senior Member
Enthusiast
|
|
Join Date: Feb 2005
Location: Hampshire
Posts: 2,497
|
|
Nice a well oiled machine it is then. |
24th February 2015, 20:56
|
|
Senior Member
|
|
Join Date: Dec 2013
Location: Sunny Cumbria
Posts: 470
|
|
It's been a long and very mixed day today, Started out fixing the radiator in position, then the drill slipped and went through the core. I won't go into the details but I was very cross.
When I had calmed down and taken the rad back out, I spent the rest of the morning finding the minute hole in the rad, I had to cut one of the tubes out to get to the second row. It was only a tiny pinhole but it sure leaked a lot of water. Eventually I soldered it up and soldered the side plate back on, that caused another leak... When I had it water tight at about 1:30 (pm) I stopped for lunch.
This afternoon I piped the rad back up to the engine and filled it with water again... All seemed OK until I noticed the valley gasket starting to pool water. The thermostat gasket was leaking??? Why? Turned out the thermostat had dropped between the gasket and the housing, simple remedy that one!
Since then I have been installing the front brake pipe and securing it with 'P' clips, I need to get some more small ones... I clipped up the front of the fuel pipe and put a small flare OP1 on the end to help seal the rubber pipe and make it more secure, I know it's not high pressure but it is important it doesn't leak.
This evening I fitted the gearbox remote. I needed four rubber spacer/anti vibration washers to fit the remote, the originals had all perished away. I have been wondering where and how to obtain some, Rimmers don't list them although they say they have all the parts, they probably do have them but I think of the cost of four rubber washers probably being about £10 delivered, surely I could make or adapt something? I have a sheet of thick rubber, about 12mm thick and plenty big enough. It was exactly the right thickness, so I drilled a hole through a small chunk and sandwiched it between two large washers and used the angle grinder to make the rubber round, then I used the Dremel to slit the rubber in half to form two washers. It worked like a charm, I repeated the process and had my four washers to mount the remote.
I paid £5 for the off-cut of rubber, I made four front tie rod bushes, an anti Vibration mount for the fuel pumps and now I have made these washers. A good buy by any standards.
I have had enough excitement for one day, off to bed...  Unfortunately no pix today, been far too busy.
Oh, another thing, I forgot to mention, I passed the 80% complete mile post. It's actually 82.62% complete right now. (Assuming the rad doesn't spring another leak...)
Last edited by 8 Valve Ed; 24th February 2015 at 21:05..
Reason: 80% and typos, actually auto corrections which were wrong...
|
24th February 2015, 21:32
|
 |
Senior Member
|
|
Join Date: Feb 2012
Location: Wembley, London
Posts: 5,058
|
|
8 Value Ed - Sounds like you really had one of those days.
But at least passing the 80% mark must have been a good feeling.
Good luck, Paul.
PS
I forgot to say what a great job you did shaping the boot floor. 
|
|
Currently Active Users Viewing This Thread: 1 (0 members and 1 guests)
|
|
|
 Posting Rules
|
You may not post new threads
You may not post replies
You may not post attachments
You may not edit your posts
HTML code is Off
|
|
|
All times are GMT +0. The time now is 09:28.
|


 Hybrid Mode
