|
|
| Sammio Builds and discussions Sammio bodied car builds and specials |

20th August 2014, 08:46
|
 |
Senior Member
|
|
Join Date: Feb 2012
Location: Wembley, London
Posts: 5,058
|
|
Mr T - Feel free to chip in any time, your comments are always welcome. 
Despite a "To Do" list that stretches across several pages, I do feel I have really broken the back of this project.
Although, given how long the simple "trim spare hump" task actually took, I still have a long way to go. 
But once I get the bulkhead & rear frame / arches off for the last time, I will actually be assembling the car.
Then all the prep / mock up work on things like the dash, heater, wiring, etc. should really start to pay off.  Mac
Mac - Thanks for the support, I am trying hard to learn from your build thread.
Unfortunately, I need to return to bean counting shortly, which will slow my build progress down.
Your suggestions are always welcome and I will definitely be reinforce the area around the "slot".
I just need to get the body shell back on the frame so I can check for any clearance issues before I start.
Right I've got to start painting fence panels before I can play on the car....
Last edited by Paul L; 20th August 2014 at 20:11..
Reason: Typo
|
20th August 2014, 18:04
|
|
Senior Member
|
|
Join Date: Feb 2012
Location: Wembley, London
Posts: 5,058
|
|

Slow Progress - Part 1:
My wife & I actually started painting some fence panels last night & by lunch time we had made good progress.
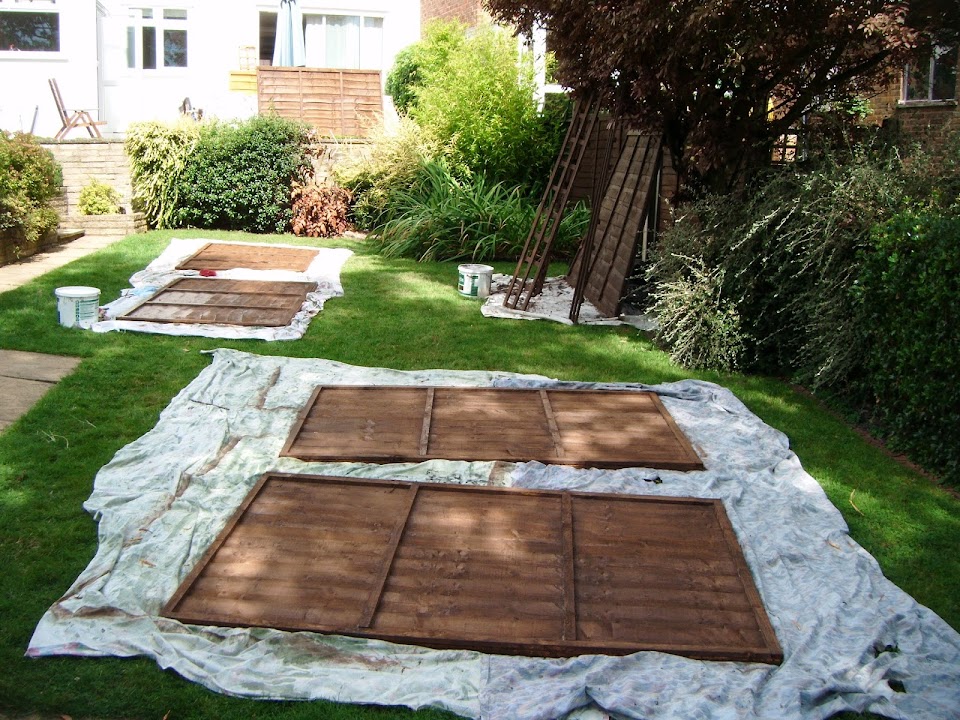
So when my wife had to go out, I was given time off for good behaviour.
She also helped me put the body shell back into position & this highlighted a problem with the hump.


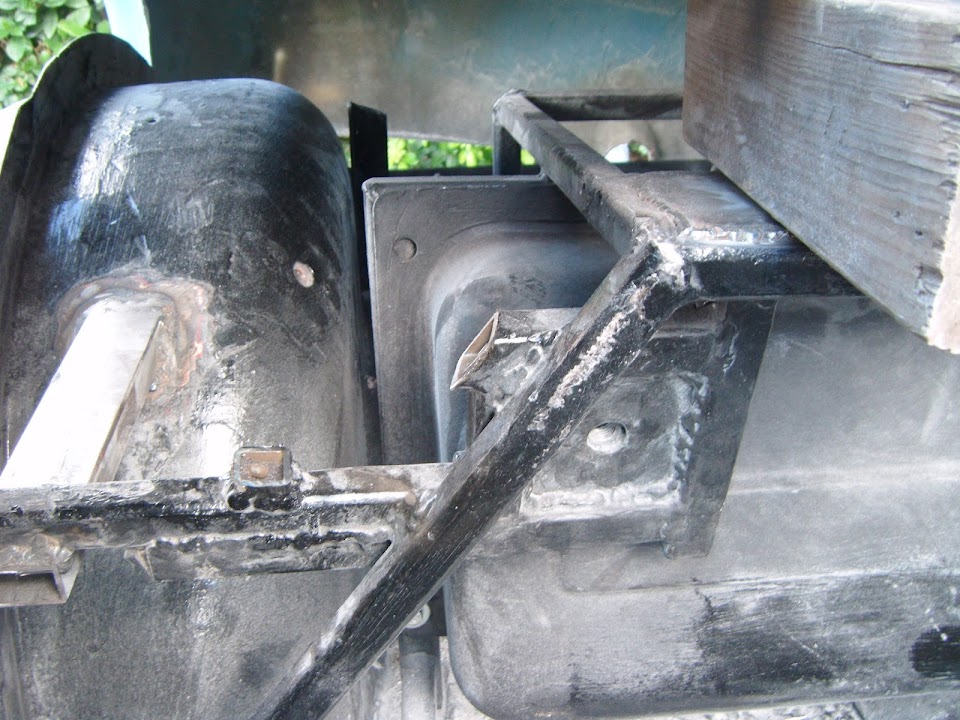
Yes, my OTT seat belt anchor plate mounting was completely in the way. 
This was Mac's equivalent...

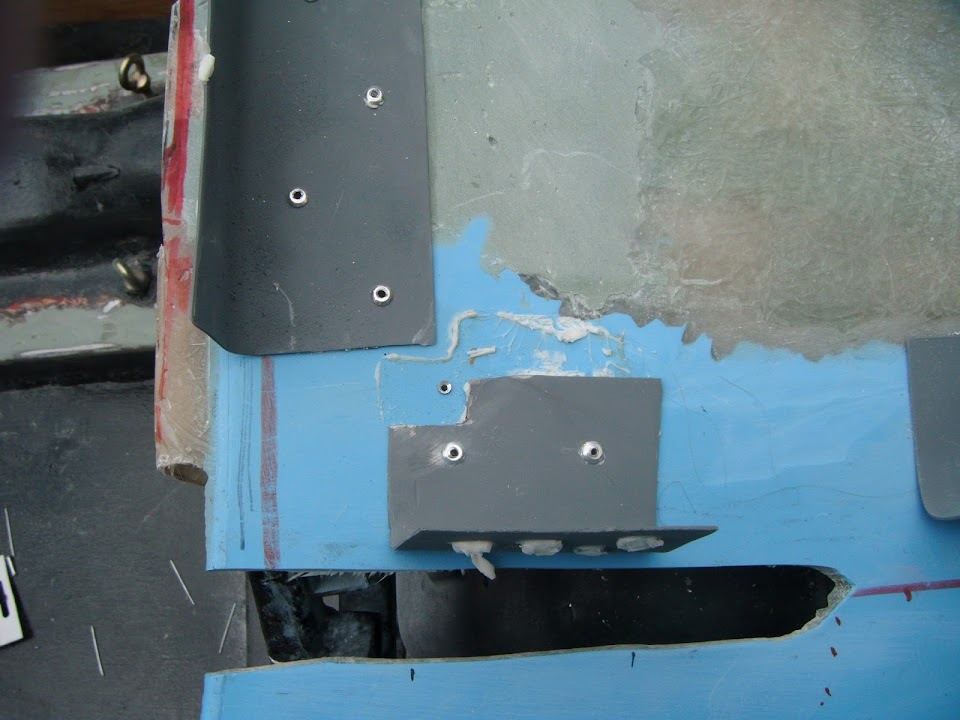
So I decided to simply cut off some of the excess box section.


I will tidy the cuts up when I take the frame off, but there is nothing in the way of the hump now.

Note: There was yet another round of tedious testing and trimming before the hump finally sat nicely. 
I also remove the excess box section on the other side.
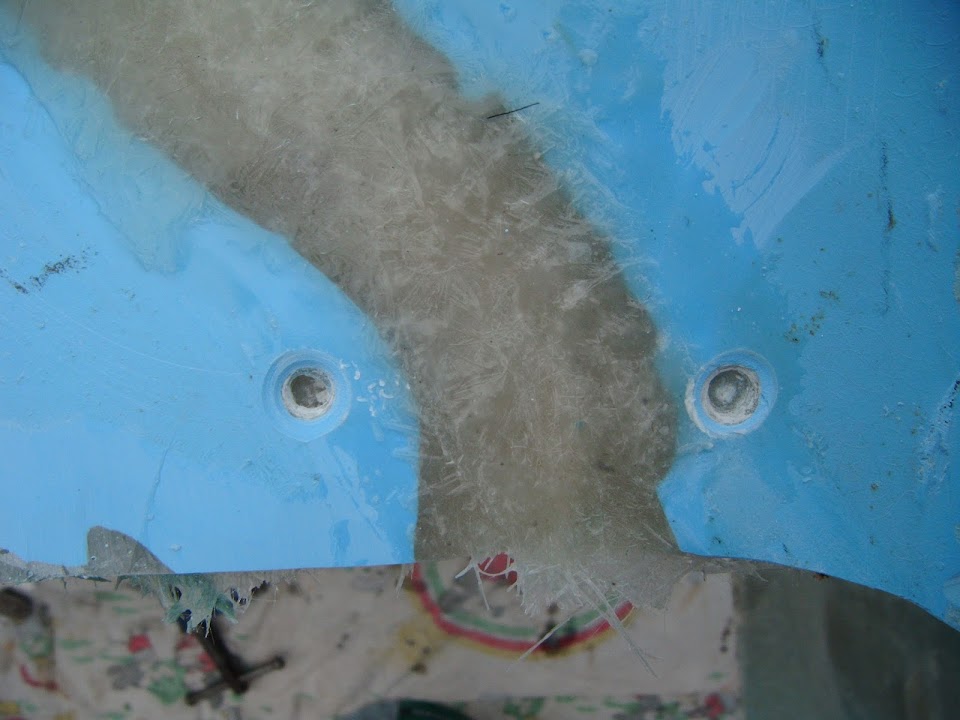
You might remember this bracket was also in the way, resulting in a notch in the fibreglass.

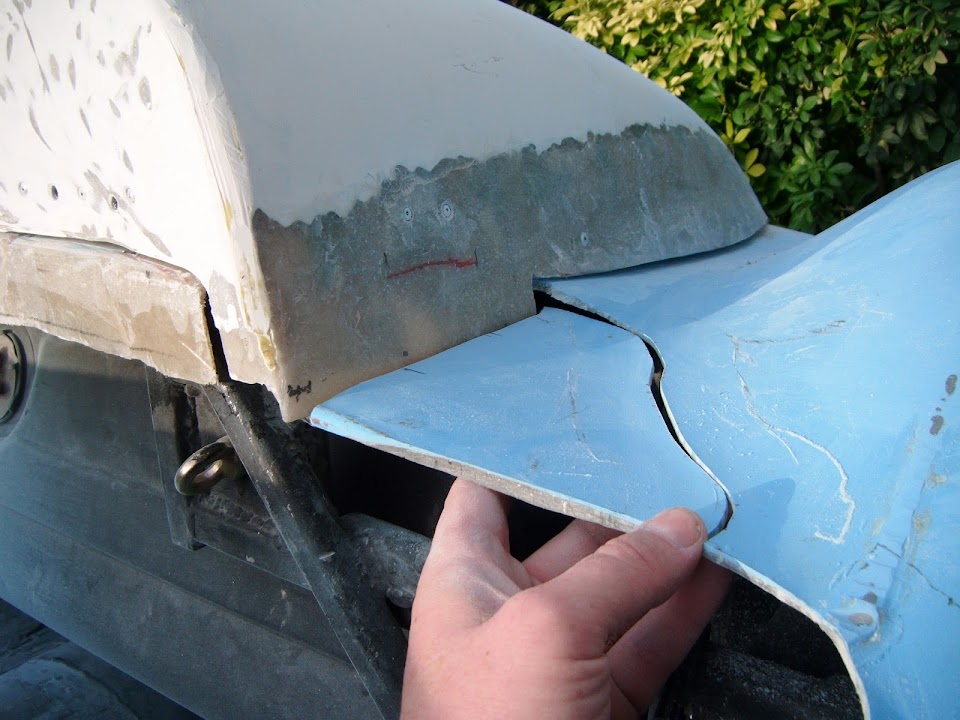
Next I trimmed the cockpit edge on the passenger side.


This allowed me to mark up where I am going to cut and re-attach a section of the body shell.
( This takes account of the curves of the rear arch. )

I also roughly laid out where the filler cap needs to go and an option for my boot opening.

I will need to make a final decision on where this is going before I fix the hump in place.
As I will be cutting across the two humps and don't want to hit a fixing bracket when I do.
And the hump fixing brackets were the next job....
End of Part 1...

|
20th August 2014, 18:05
|
|
Senior Member
|
|
Join Date: Feb 2012
Location: Wembley, London
Posts: 5,058
|
|
Slow Progress - Part 2:
I recycled some of the last off cuts from the lowered floor pans.


Then I laid them out on the body shell to get a rough idea of where they would go.

When I finalise the line for the boot opening, I can space the brackets either side of the cut to match.

Then it was simply a case of clamping the metal and hitting it with a hammer.


Obviously the final shaping of the brackets will take place once they are fixed to the body shell.
I put some etch primer on the inside faces of the brackets.

But I won't go the outside faces until I've drilled the holes for the rivets to hold them to the body shell.
( That way I wont mix up which way round they go. )
I had one bracket left over as there isn't enough room at the very end of the hump for a bracket on each side.
So I used that to test rivet the bracket to a section of fibreglass.

Unfortunately, due to the extra matting I used inside the spare hump, it is a bit thicker than this.
So I need to get some longer rivets for the job.
As it happened, by now, the dark clouds had gathered, so I started to pack up.
At which point I realised that I need to modify my wooden cover for twin humps.

I had to nip to Halfords for an indicator bulb for my wife's car & picked up this box of rivets while I was there.

Not use I will ever use all 750 rivets, but I didn't want to waste any more time looking for them.
At least they have plenty that are longer than the ones I have already got.

I will do another test with some thicker fibreglass just to make sure these are OK to use.
Now I just need to agree where the boot opening is going and take it from there.
So until next time, take care, Paul. 
|
20th August 2014, 22:36
|
|
Senior Member
|
|
Join Date: May 2013
Posts: 2,161
|
|
You are doing just great Paul! Like Towed said, its your car to be done to your satisfaction, and the humps look fine, but will look just about perfect when the final paint goes on!!
I admire your tenacity! Just keep at it.
|
21st August 2014, 17:04
|
|
Senior Member
|
|
Join Date: Feb 2012
Location: Wembley, London
Posts: 5,058
|
|
Scottie - Cheers, if I can blend in this second hump half as well as Mac did his two humps I'd be very happy.
It is funny how this project has fought me almost every step of the way and taken miles longer than I thought it would.
But I am very slowly reaching the point where glimpses of the final car are starting to appear at long last.
I'm really looking forward to the stage when the first coat of primer makes all the construction scars disappear.
- - - - - - - - - - - - - - - - - - - - - - - - - - - - - - -
Today, I have mostly been...
... sorting out fence panels. 
The only good news is that the bulk of the work is now done and I should be able to play with the car tomorrow ( touch wood).
I did manage to do a quick experiment with a couple of the new rivets I got yesterday.
This rivet was marginally bigger than the one I tested yesterday.

And here is the depth of the first panel for comparison.

This one is much longer than the one in the original test.

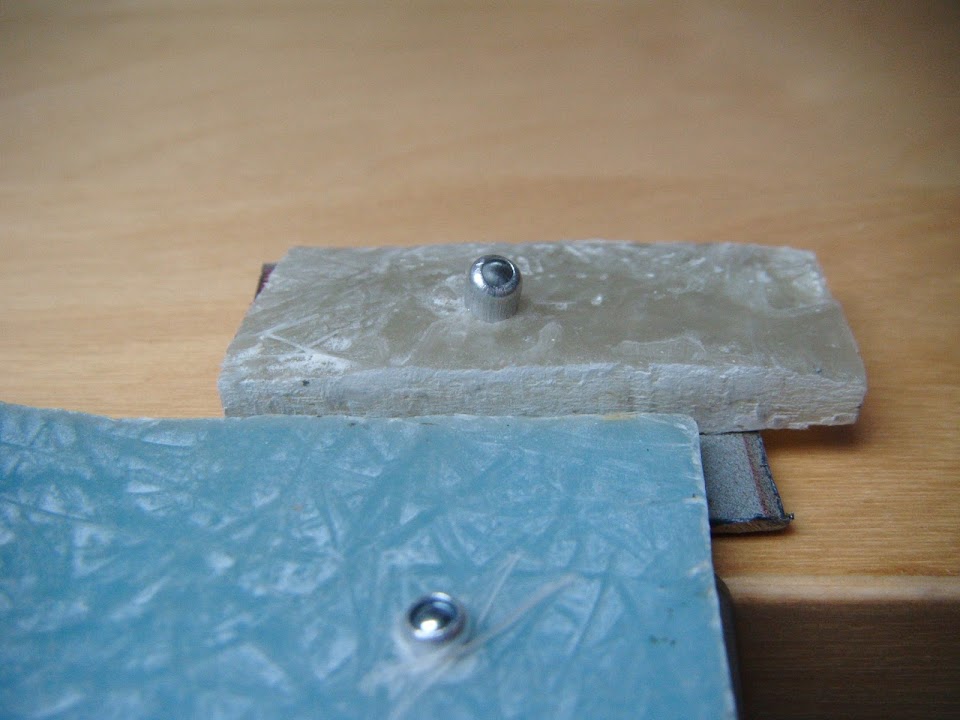
So it should be no problem to fix the brackets to the body shell and then to the spare hump.
I must confess I am still amazed at just how good the rivets are at fixing the brackets in place.
Although, I will still follow Mac's example and "stick" them down as well.
Take care, Paul.
|
22nd August 2014, 16:43
|
|
Senior Member
|
|
Join Date: Feb 2012
Location: Wembley, London
Posts: 5,058
|
|
Tomorrow Never Comes...
Due to Fence Panel "Mission Creep" I did not get to play with the car today.
It has taken most of the day for my wife and I to finish off the fence panels and trellis.
I had to do some pruning to get better access to the panels and ended up on a pruning frenzy.

Now that we have replaced the entire line of fence panels, we can put off straightening the fence posts themselves for a while.
( Ideally two years or more!  )
This is the view from my neighbour's side and you can see the line is a bit wonky to say the least.
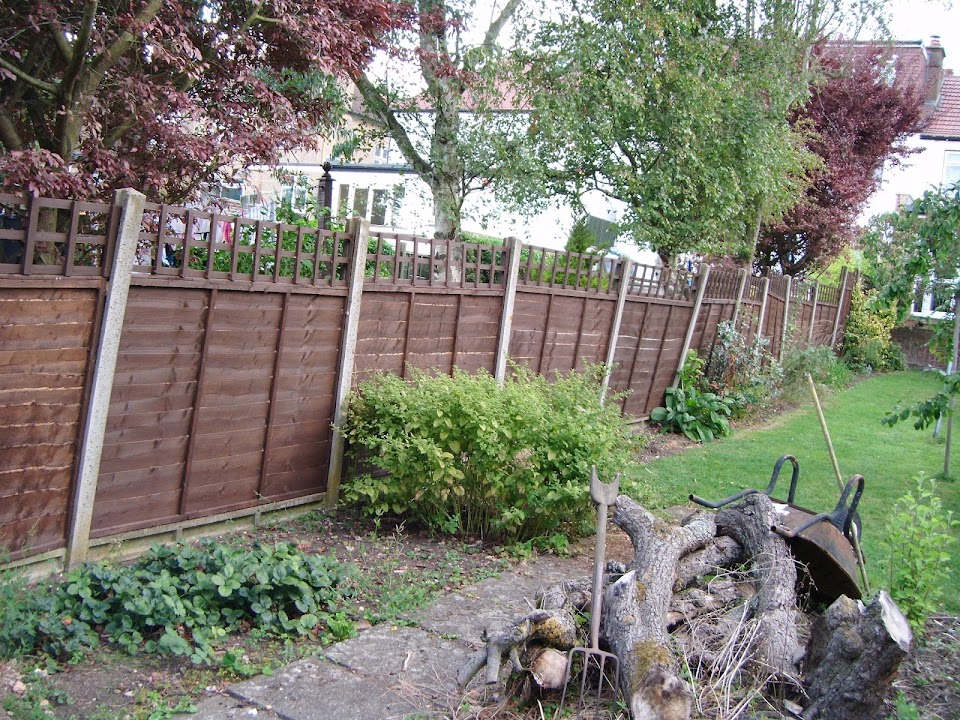
This problem stems from the previous owners of our house planting trees close to the fence line & the roots lifting them.
Anyway, after roping in our daughters to help tidy up the garden was restored.

Thankfully I do have one car build related photo...
I drilled & ground smooth the rivet holes in the base of the brackets to fix them to the body shell.
Then I gave the outside edges a coat of etch primer.

I also had to "touch up" the primer on the inside after I ground down the rivet holes on both sides.
Whilst it is still light outside, I am just too tired to attempt to fix these to the body shell tonight.
After re-reading how Mac fitted his humps, it is clear I need to be thinking straight to avoid any mistakes.
So I'd rather wait and start this job with a clear head in the morning.
Cheers, Paul.
|
22nd August 2014, 18:23
|
|
Senior Member
|
|
Join Date: Apr 2012
Posts: 1,163
|
|
"This is the view from my neighbour's side and you can see the line is a bit wonky to say the least."
Didn't know that Sammio made fences...........:-)
|
23rd August 2014, 19:22
|
|
Senior Member
|
|
Join Date: Feb 2012
Location: Wembley, London
Posts: 5,058
|
|
Mac - You are a very naughty boy.
- - - - - - - - - - - - - - - - - - - - - - - - - - - - - - -
A Frustrating Day - Part 1
All I wanted to do was fix the spare hump into position and Mac had provided a step by step here.
Yet I still managed to make a complete hash of it, during a day filled with schoolboy errors.
It started off well enough as I knew I had to take account of the fact the sides of the hump varied in thickness.


Plus the front face of the hump wasn't flat.


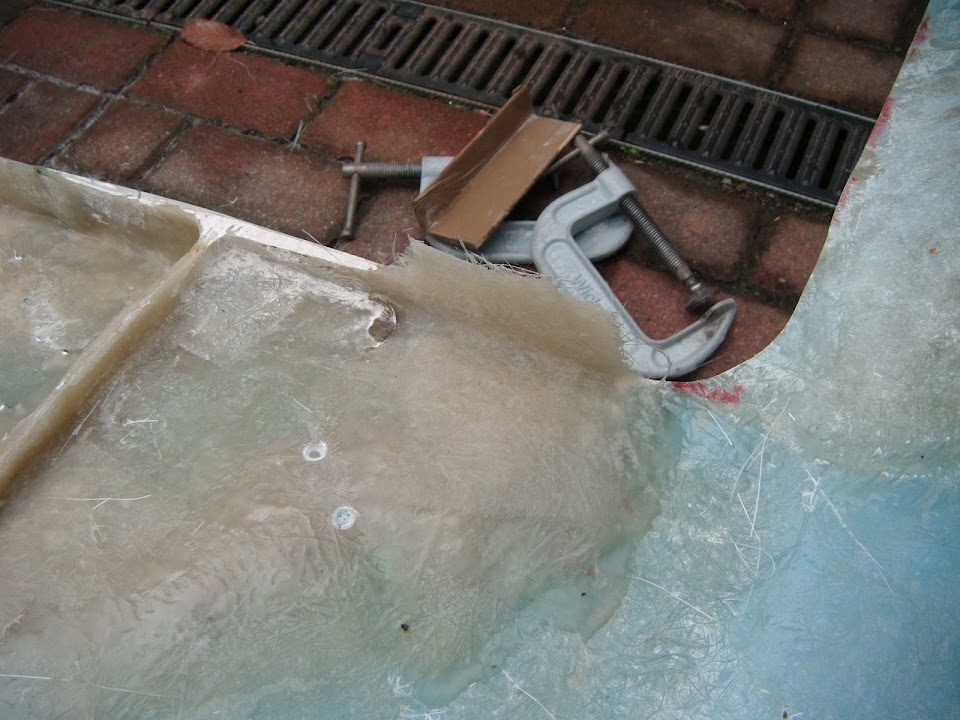
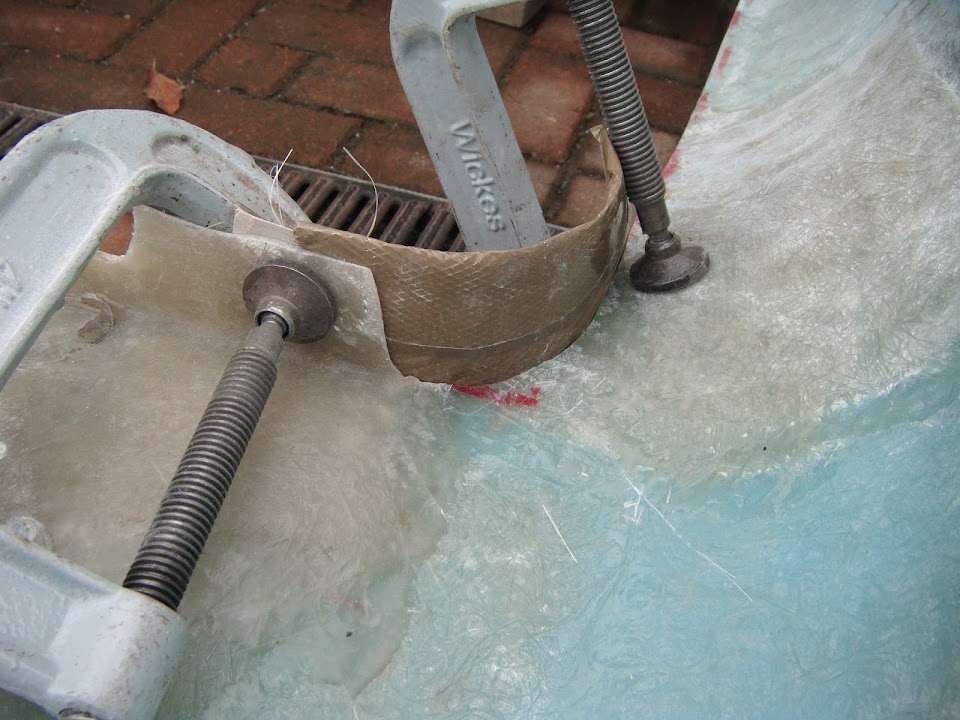
In order to leave a little room for the fibreglass filler to get underneath the edges, I propped up one side a bit.

I laid out the brackets and found one needed a small adjustment.


This was the first warning sign that I was making mistakes, but I didn't spot it at the time.
I marked up where the rivet holes needed to go and drilled some holes.

Applied glue to the underside of the first bracket.

And riveted it into position.

Eventually all the brackets were fixed into position.

It was only after the first test fit of the hump I realised one bracket was in the wrong place.
So I had to drill out the rivets and re-fix it.
Clearly when the brackets are in the right place, there was no need for an adjustment. 
Unfortunately, things started to go rapidly down hill from here as one problem after another arrived...
It was little things like breaking the last good drill bit I had for the rivet holes.
This meant drilling a smaller pilot hole, then rubbing the hole to death with the only brunt drill bit I had left, then counter sinking the hole.

When the pilot hole bit snapped, I had to make an emergency trip for some more bits, & got there just before the shop closed.

End of Part 1...
|
23rd August 2014, 19:22
|
|
Senior Member
|
|
Join Date: Feb 2012
Location: Wembley, London
Posts: 5,058
|
|
A Frustrating Day - Part 2
But the real problem was that I didn't have the brackets in the right place to begin with.
I was expecting the brackets to be pulled in tight to the hump, but it was the other way around.
So after doing one side completely, the hump had moved in close to one line of brackets, but in turn too far away from the other.
I thought I had taken a photo of this, but it must not have come out.
Although at this point I really was having a bad day and started contemplating whether I could get away with just fixing one side.
( It was remarkably solid at this point. )
But deep down I knew that I had to do the job properly, or at least as good as I could.
So I had to drill out all the rivets and start again and I was not a happy bunny to say the least.
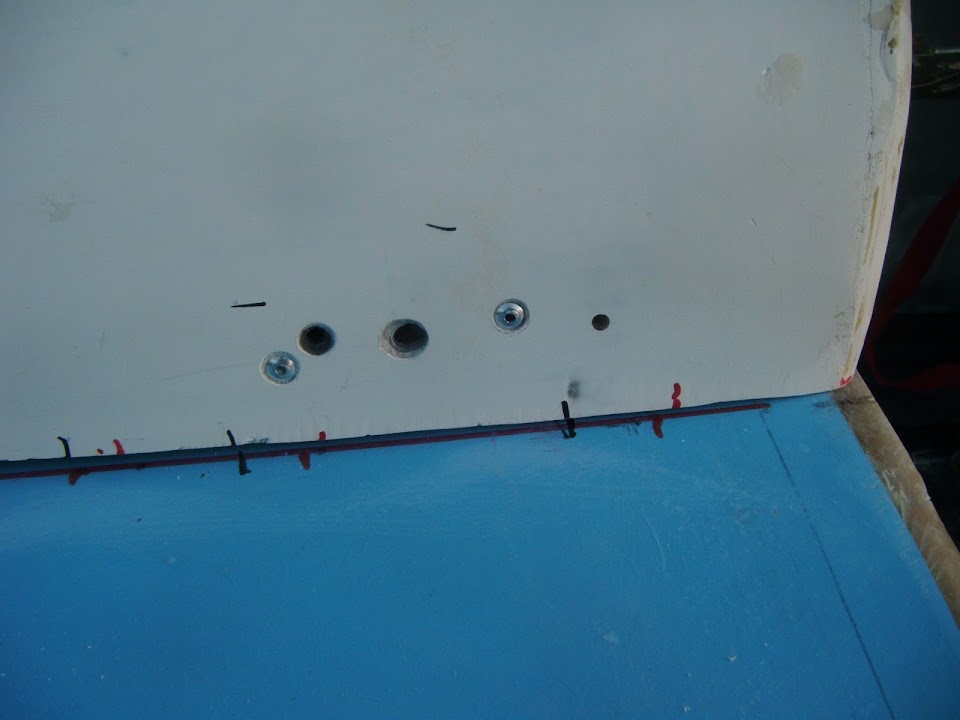
Especially as I was still having drill bit problems meaning some rivets made a complete mess of the holes in the hump.
Then I had to re-bend almost all of the brackets and then add extra rivets to some.

This was the bracket layout "Take 2".

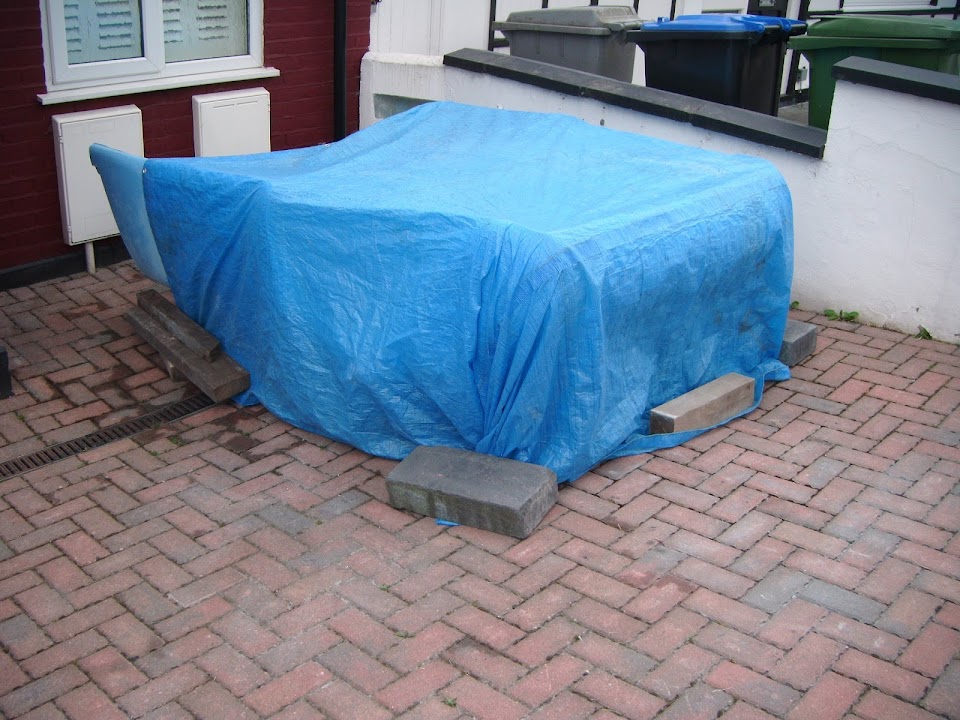
Just to add insult to injury, this is what the sky now looked like.

So I was forced to pack up and take shelter while the rain came down.
But I just couldn't face ending the day on such a low point, so I went back out when it stopped raining.
By the time I had broken my 10th drill bit of the day I noticed the drill itself seemed to be wobbling, so that might be the problem.
Thankfully I had one bit left to do the last rivet and the hump was finally fixed in place.
I've love to say that all the rivets looked as nice as this.
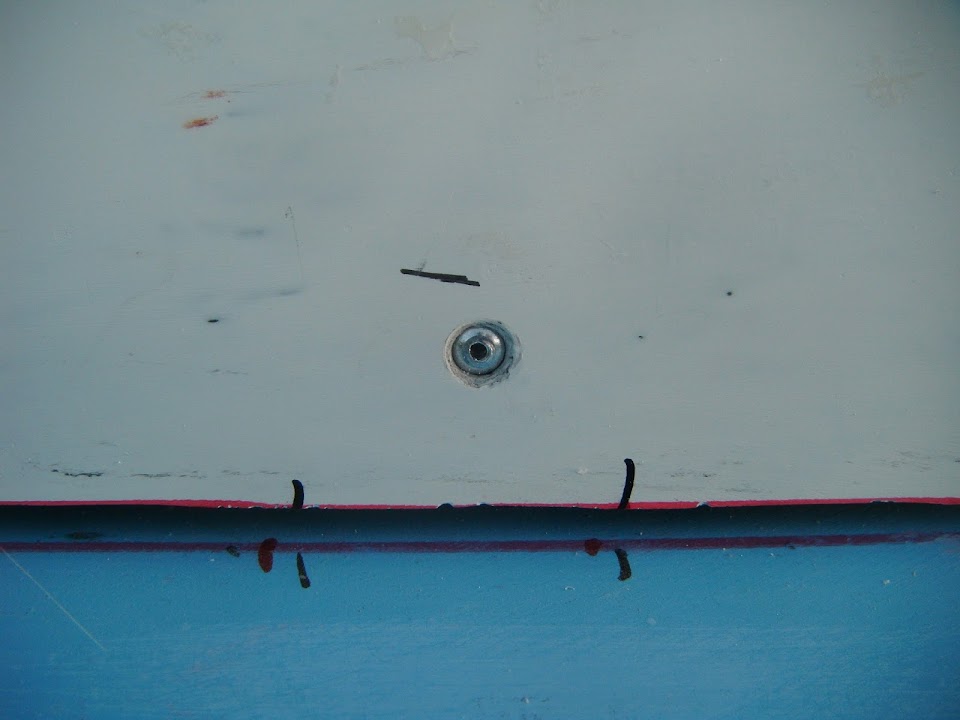
But this is a "warts and all" build thread, so these rivets tell the real horror story of this job.

The only good news was that at least the hump wasn't going anywhere.


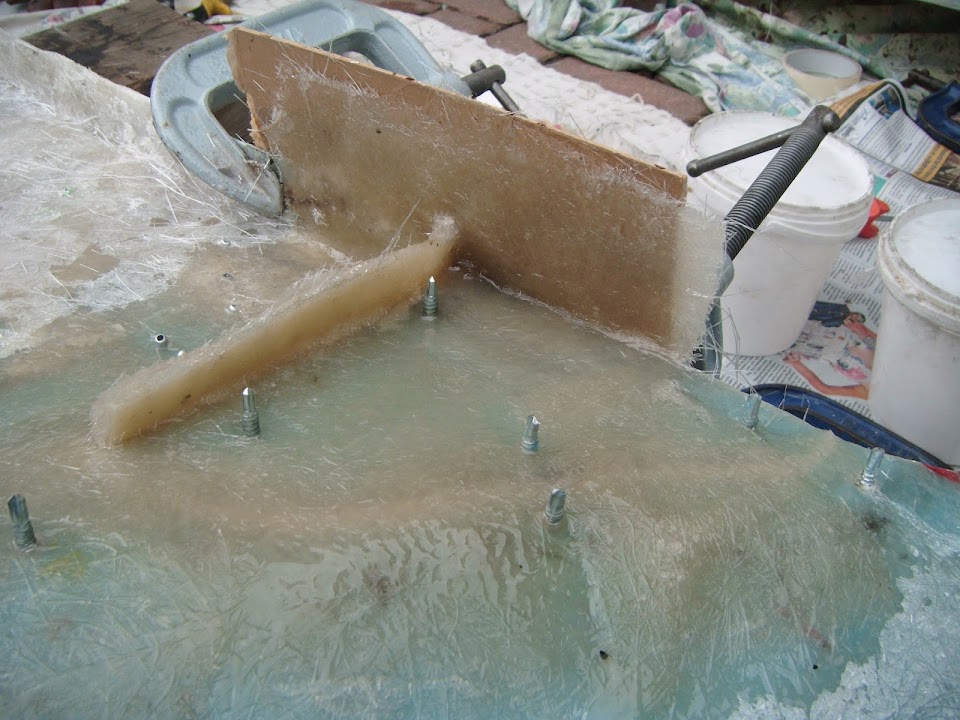
It really is rock solid and I still have to add fibreglass filler into the gap and over the join.
In preparation for that work, I roughed up the gel coat on both hump faces.


And along one side of the hump itself.

I also did the area next to the driver's hump as I want to build this area up a bit to match the passenger side.

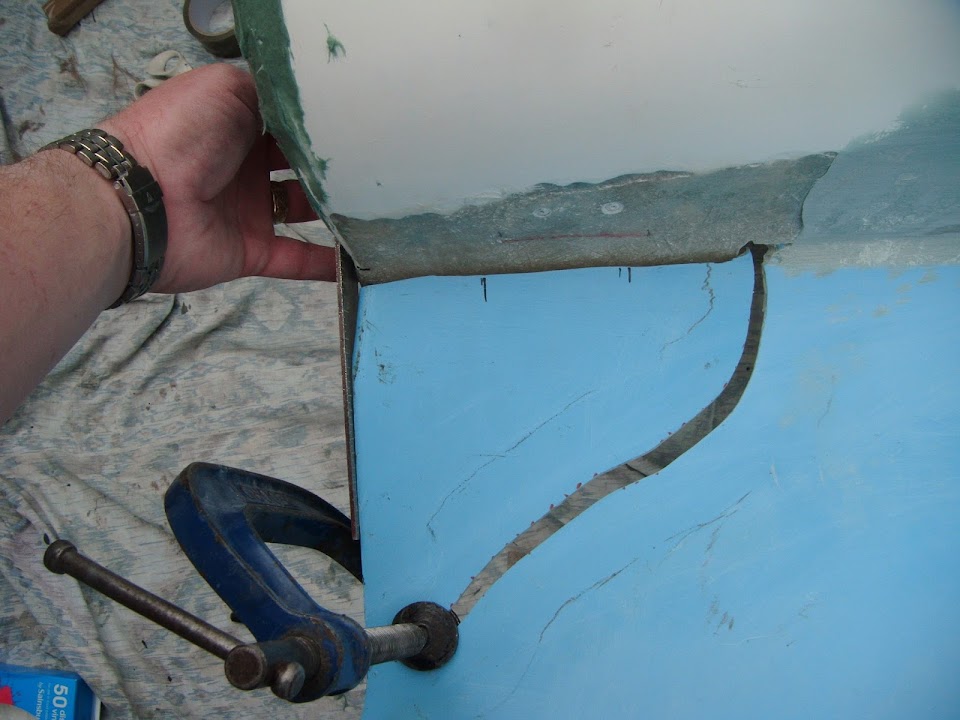
The last job of the day was to cut out this section of the body shell.

Which I need to re-attach somewhere around here.
Hopefully, this should improve the balance between the two sides when viewed from the front.
Clearly there is still quite a bit of work to do before I can say the hump is finished.
But this was a big, if somewhat painful, step in the right direction.
Until next time, take care, Paul.
|
23rd August 2014, 21:07
|
|
Senior Member
|
|
Join Date: Apr 2012
Posts: 1,163
|
|
Paul,
You got there in the end! The extra holes will just act as extra keying points for the filler.......:-)
Quick skim of the green stuff and shell be good mate.
Mac
|
24th August 2014, 16:21
|
|
Senior Member
|
|
Join Date: Feb 2012
Location: Wembley, London
Posts: 5,058
|
|
Mac - Cheers.
The step by step guides you put in your build are a big help and the sanding block set is certainly being used a lot.
- - - - - - - - - - - - - - - - - - - - - - - - - - - - - - -
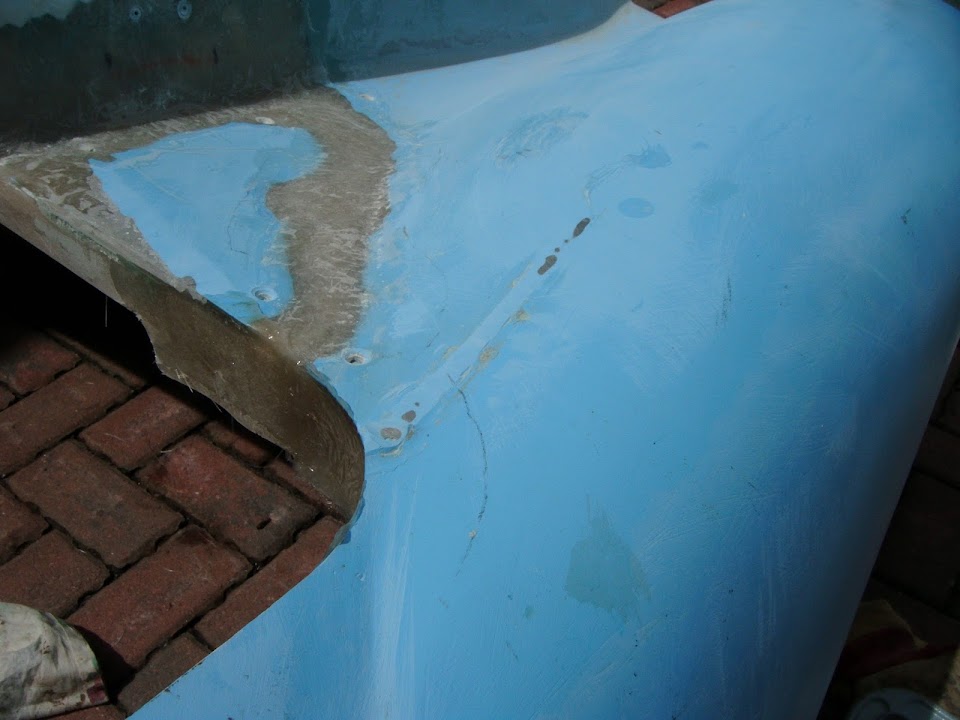
What A Difference A Day Makes - Part 1
I'm pleased to report that I had a much better day on the car today...
The bulk of the day was taken up with adding filler and roughly sanding it down.
Hopefully it will be easier to see the differences if I stick to one section at a time.
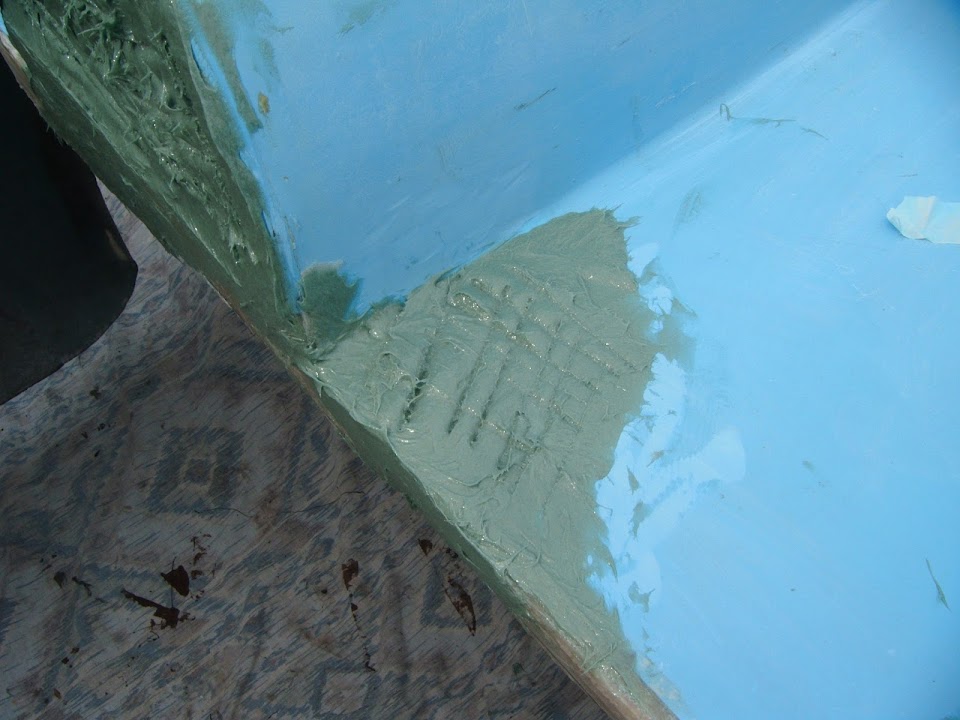
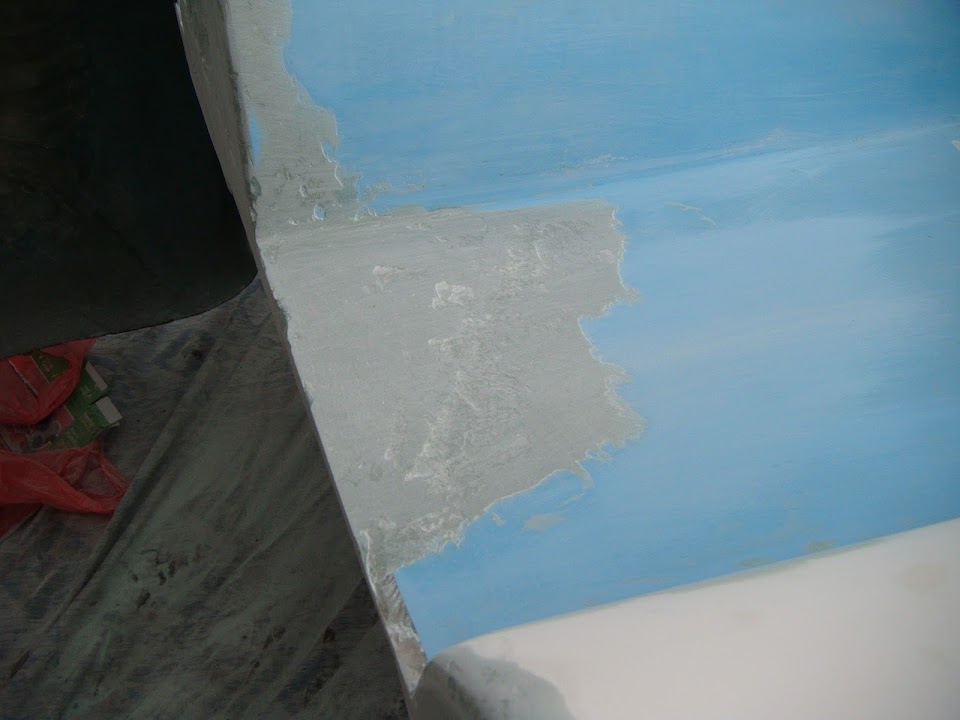
Outside edge, cleaned and ready to go.

Fibreglass filler added, pushed into the gap between the hump & the body shell, plus over the rivets.

Roughly sanded down when that was initially set.

Another round of filler was added to cover the join and smooth the transition from hump to body.

This too was sanded down.

Obviously everything I did on one side, I replicated on the other.


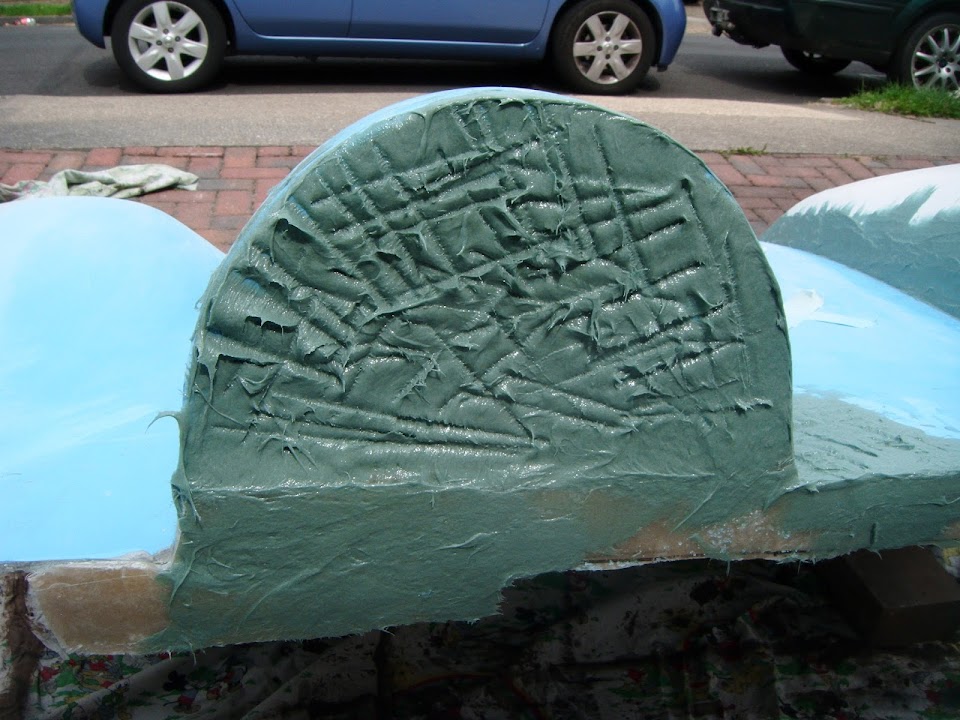
The "tail" of the hump had some extra filler added below it to cover the previous repair work and blend it in better.


The filler is quite "runny" so I build up the vertical faces of the humps in stages.
Passenger Side:


End of Part 1...
|
24th August 2014, 16:24
|
|
Senior Member
|
|
Join Date: Feb 2012
Location: Wembley, London
Posts: 5,058
|
|
What A Difference A Day Makes - Part 2
Driver Hump:


I also started building up the body shell area next to the driver's hump.
I was hoping to re-fix the section of body shell I cut out next to the passenger hump.
So I lined up the front edge with the rest of the rear cockpit lip.
Then added some brackets to hold it in place.

Including the bracket I had "left over" from fitting the hump itself.

But once again the clouds were gathering overhead.

So I decided not to push my luck and packed everything away and put the body shell back in place.
You can see there is plenty of room to fibreglass the panel back in from underneath.
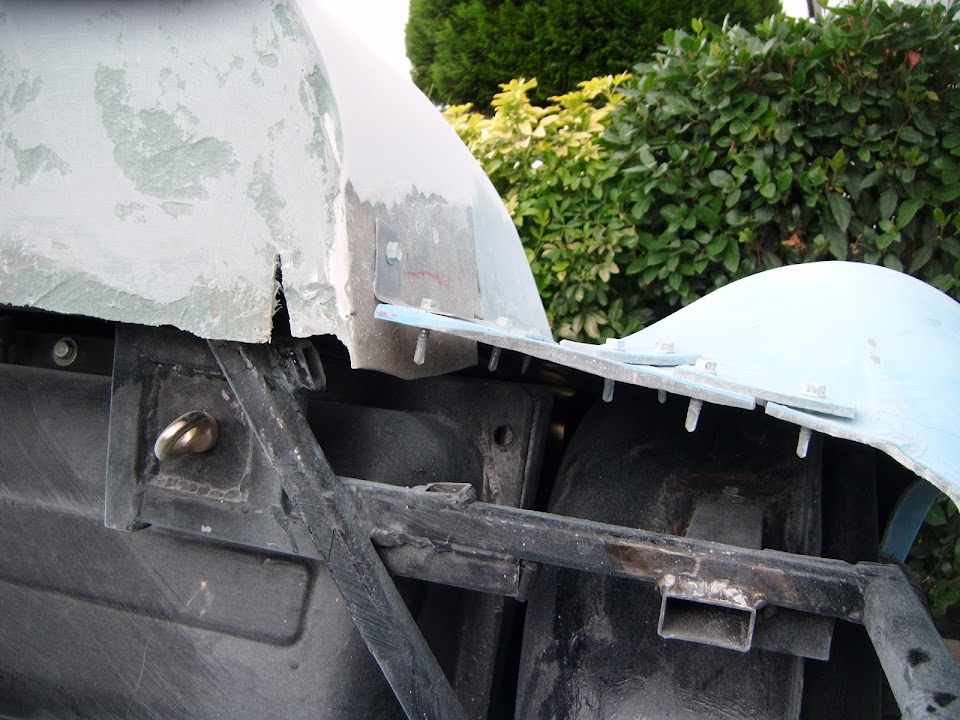
You will also notice I have modified my wooden cover to match.

There is still plenty of normal body filler to apply and lots more sanding down required.
But today was a good day in terms of pulling all the modification work together.
So I'll end with a "before" & "after" view from the front.

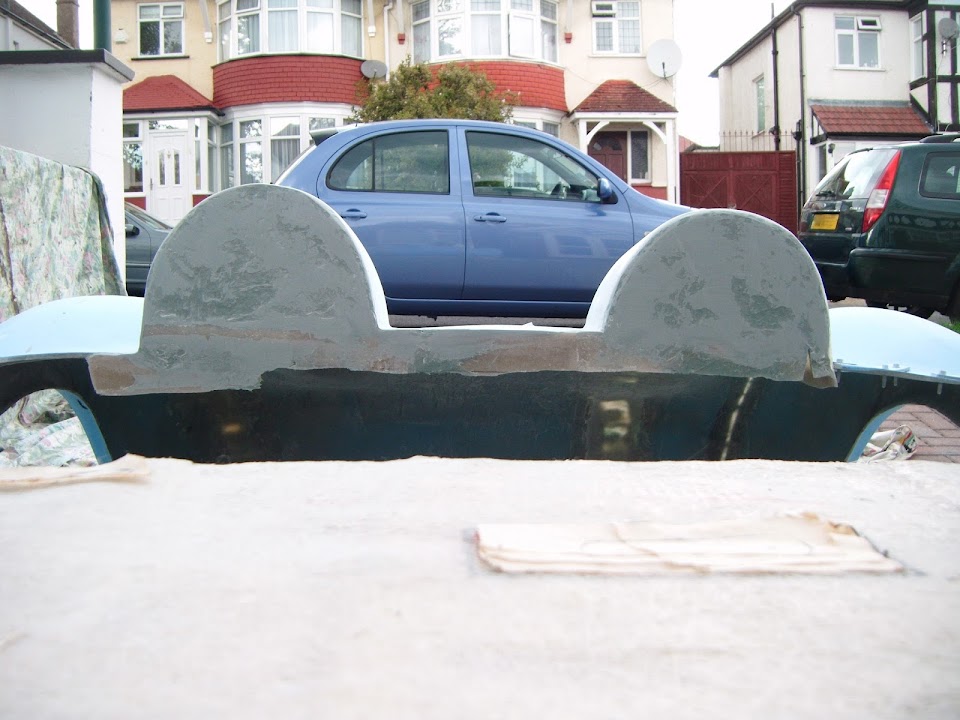
Note:
The passenger hump profile is slightly smaller than the driver's, but I think that looks OK.
And, as always, this view will improve when I finally get around to finishing and tidying up the rear cockpit lip profile.
Given the weather forecast and my growing list of other chores, I will now leave the car for a few days.
So until next time, take care, Paul.
|
25th August 2014, 19:30
|
|
Senior Member
|
|
Join Date: Feb 2012
Location: Wembley, London
Posts: 5,058
|
|
Mac - Sorry I didn't see your "hurry up" message when I was previewing Part 2.
- - - - - - - - - - - - - - - - - - - - - - - - - - - - - - -
Rear Cockpit Lip Design:
The next job I hope to tackle will be to fix this panel back into place.
But I want to build up another section of the rear cockpit lip at the same time.
Which got me thinking how to take into account the differences in heights across the body shell / humps.
This is what it looks like now.
And these are my initial thoughts on what this lip could finish up looking like.

Top:
A simple straight line that will make the lip thicker between the humps, compared to the sides.
Middle:
Keep the lip the same depth in the middle & sides, with some sort of transition in the middle.
Bottom:
A sweeping curve that doesn't "line up" with anything as such, but looks more natural.
( If anything the curve should be shallower, so the outside edges are not too deep. )
My current plan it to paint the lip the same colour as the body shell, with black cockpit walls beneath it.
On the assumption that I will have the panels "tucked in" behind the lip, but I haven't got that far yet.
I know which of the three designs I prefer, but would love to hear any feedback / suggestions.
Cheers, Paul.
|
24th August 2014, 16:23
|
|
Senior Member
|
|
Join Date: Apr 2012
Posts: 1,163
|
|
Come on where's part 2 then !
|
25th August 2014, 20:32
|
|
Senior Member
|
|
Join Date: May 2013
Posts: 2,161
|
|
I think the "natural curve" option looks best Paul.
|
27th August 2014, 18:38
|
|
Senior Member
|
|
Join Date: Feb 2012
Location: Wembley, London
Posts: 5,058
|
|
Scottie - Cheers, that is the option I have gone for (see below).
- - - - - - - - - - - - - - - - - - - - - - - - - - - - - - -
Little By Little - Part 1:
You may have read elsewhere that I got a very non-commital response from the DVLA.
The good news is I plan to apply for a revised V5C as soon as I have the body shell bonded on and see what happens.
The bad news is that getting to that stage seems a very long way off at the moment as even little jobs seem to take an age.
Today was a good example of a solid session on the car which didn't correspond with a huge leap forward in the build.
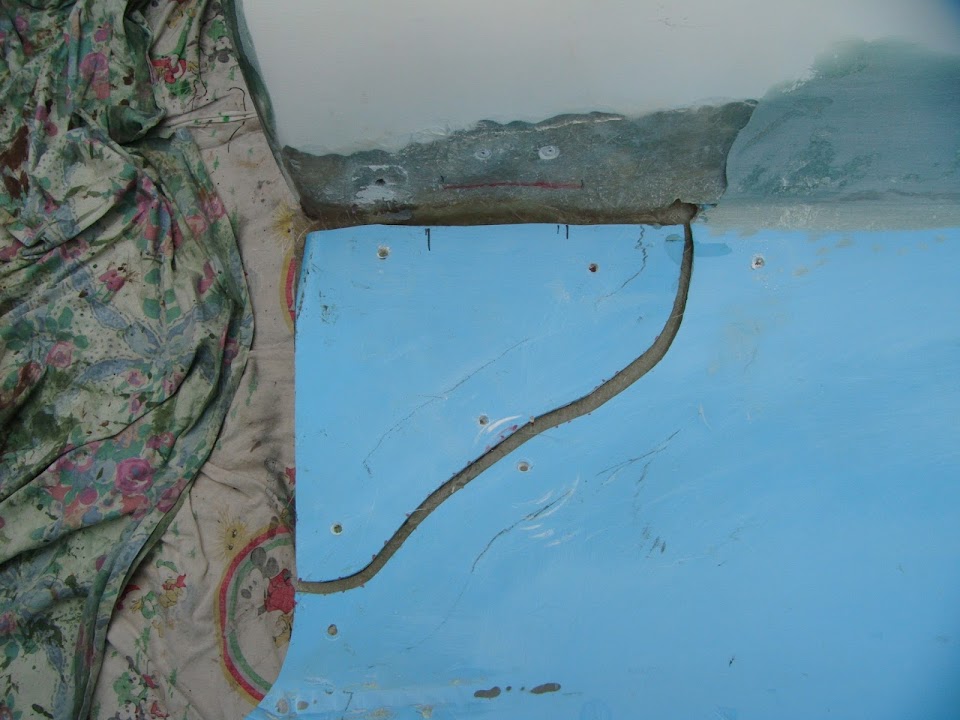
The plan was to re-fix the small section of body work I'd cut out and seal the slot created for part of the hump.
I started with this.


Added a former (yet another use for the one I used to extend the hump itself).

Two sessions and multiple layers of fibreglass later I had this.

I left that to set for a while, then removed the former and the fixing brackets to reach this stage.

Then I ground out the gel coat to give me an area to fibreglass from the sunny side.
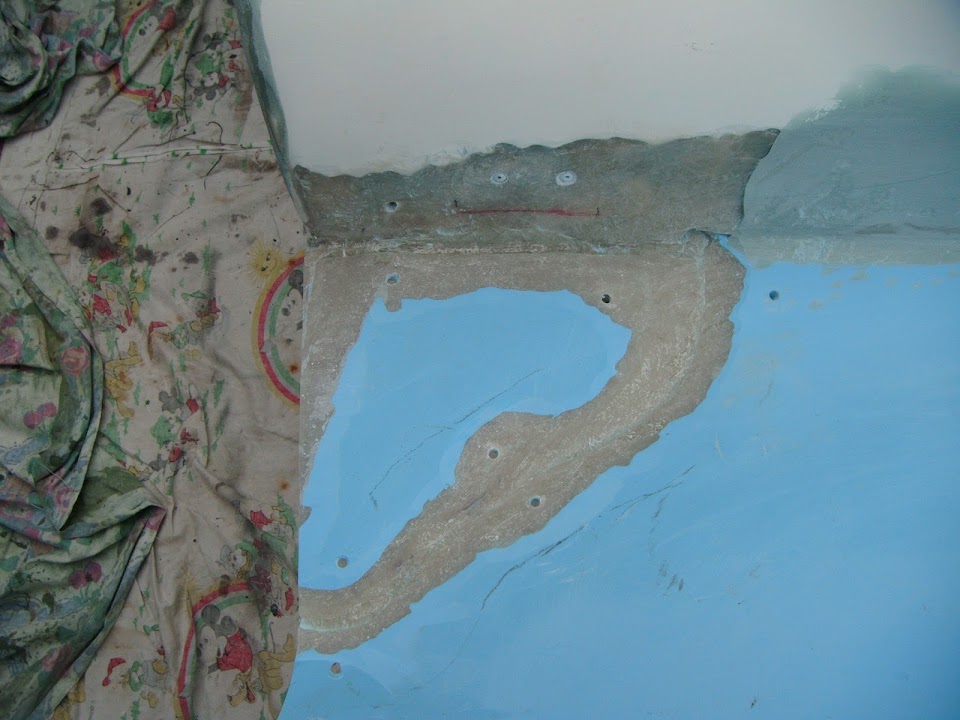
I only used about 80ml of resin to add some matting here, but still had all the same level of cleaning up to do afterwards.

While I was waiting for that to set, I added the last round of fibreglass filler to the driver's hump.

There was also a thin "slot" in the lip on the passenger side that I had previously repaired from the inside.

This also got a dollop of filler to help tidy it up a bit.

Then the filler had gone off a bit, I gave it a rough sanding down.

I'd hoped to get a skim of normal body filler on these humps today, but simply ran out of time.
I did counter sink the bracket holes in preparation for the next round of fibreglass filler on the re-fixed panel.
I also gave the rear cockpit lip a quick trim to see if that helped the view.

This line still needs a bit of work, but that is the general idea of it.
Also the panel to the right of the passenger hump will sit slightly higher after I have added some filler over the wound.
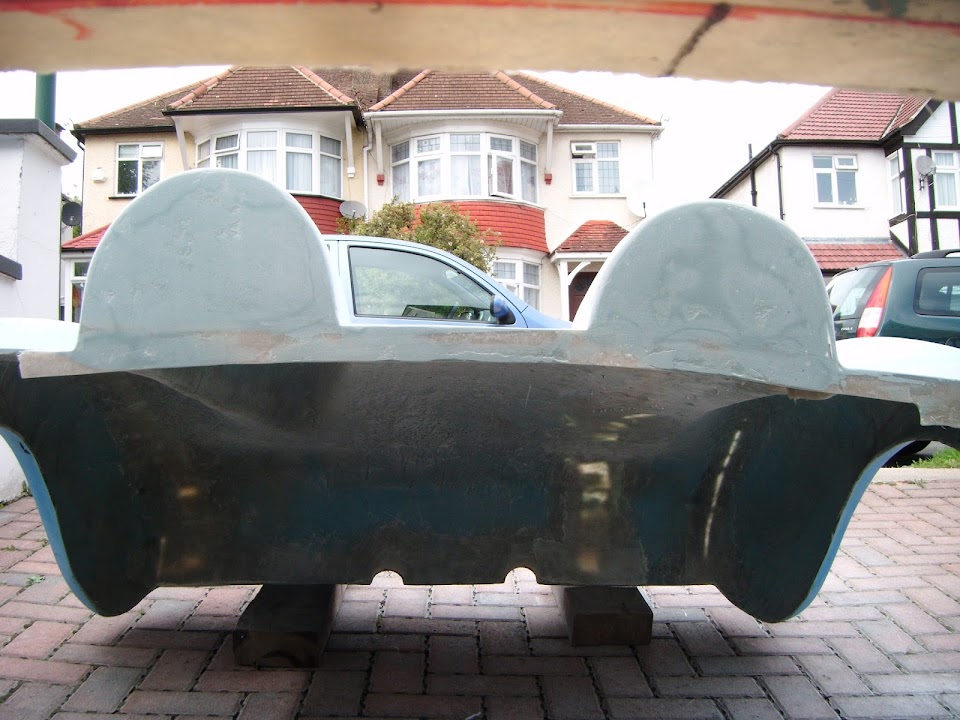
This is the view from the back and you can see the passenger hump has ended up sitting a little lower than the driver's one.

If anything, having one obvious difference might help disguise the fact there are lots of other smaller ones.
End of Part 1...
|
27th August 2014, 18:39
|
|
Senior Member
|
|
Join Date: Feb 2012
Location: Wembley, London
Posts: 5,058
|
|
Little By Little - Part 2:
With time running out, I managed to extend the rear cockpit lip along the re-fixed panel.


I didn't want to do this earlier as the fixing screws were in the way / too close to the edge.
I also finished beefing up the end of the slot where the hump fitted.


This end section of hump had been used as an anchor for the fibreglass repairs around it and it is now set really solid.
I just managed to pack everything away and cover the shell for the night when the rain came.
So although my progress felt slow, at least it is another step in the right direction.
Until next time, take care, Paul.
|
28th August 2014, 16:38
|
|
Senior Member
|
|
Join Date: Feb 2012
Location: Wembley, London
Posts: 5,058
|
|
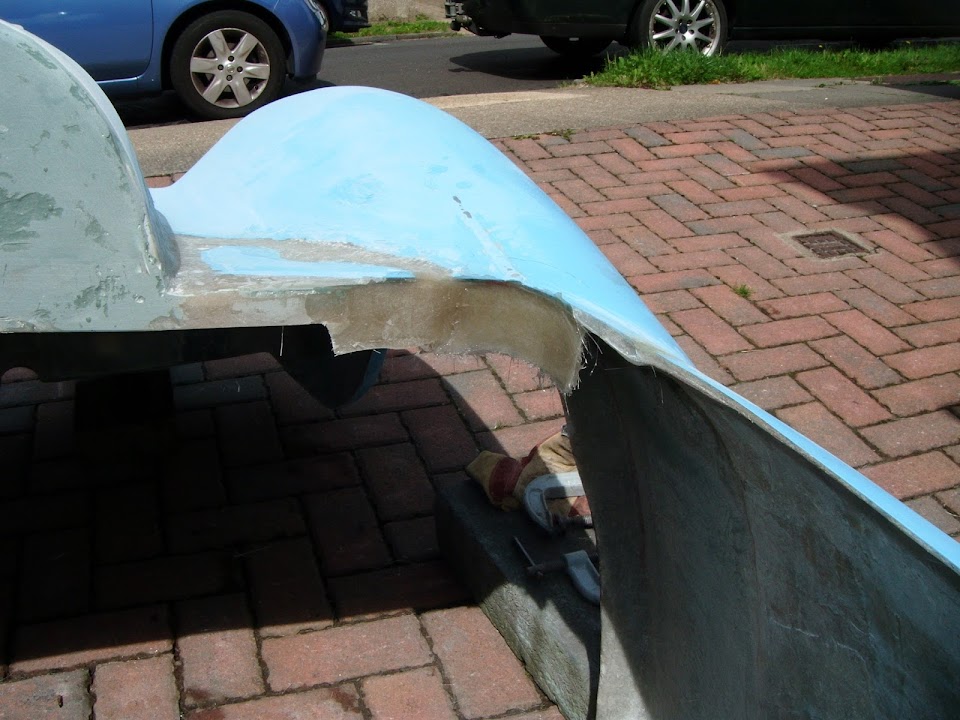
More Small Steps - Part 1:
I removed the former from the rear cockpit lip I built up yesterday.
Tidied up the edges and made a former for the corner re-using the mesh with some cardboard in the middle this time.
I cut out the matting required to start building up the corner lip and dug out my bag of "scraps".

After two fibreglassing sessions I had built up the lip and re-enforced the cockpit corner (where your hand naturally falls when getting in & out).

When that was initially set, I could turn the body shell over and remove the former.
At this point in time I plan to make the lips for the cockpit sides after I have bonded the body shell into place.
That way I have the option of 'glassing the sides directly to the internal panels without a lip getting in the way.
Before I added any filler to the panel I'd cut out & re-fixed I tidied up what remained of the flash line in the area.

Which left the area to be covered looking like this.

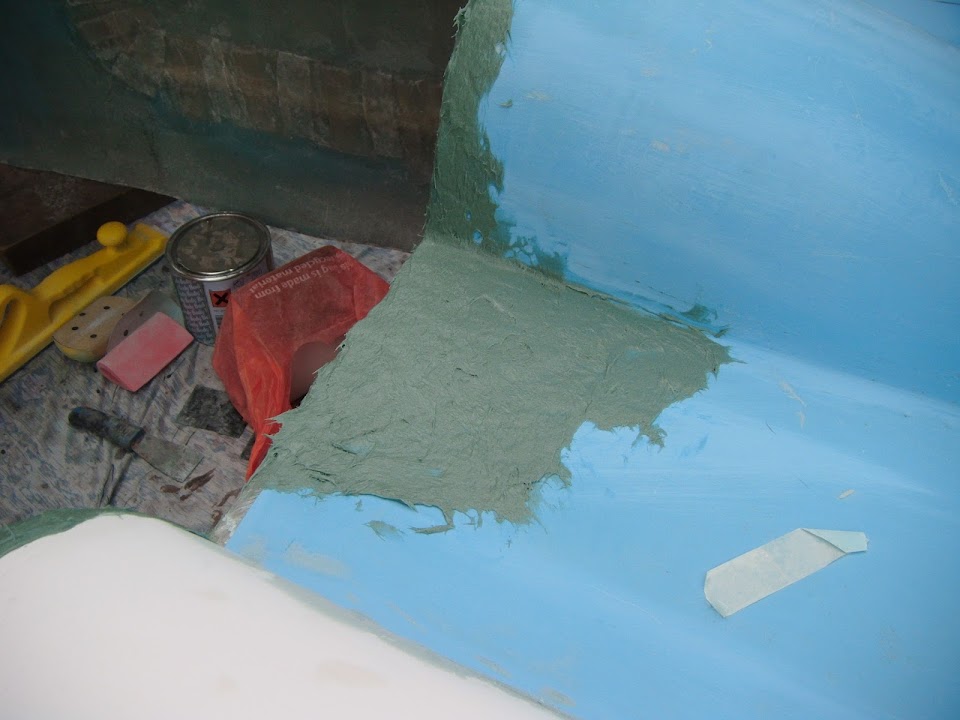
A coat of fibreglass filler later.

Unfortunately I had mixed up too much filler, so decided what was left over to give these areas a skim.


So there was plenty of sanding work required when the filler had gone off enough.


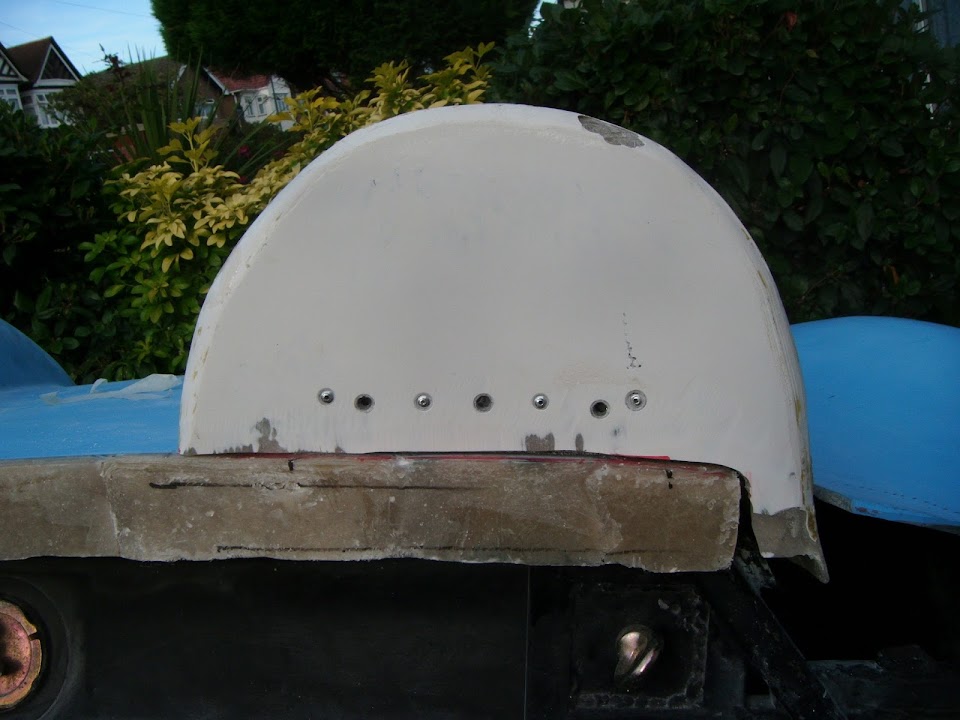
All areas still need a thin skim of normal body filler and I can see why prepping for paint is such a pain to do.
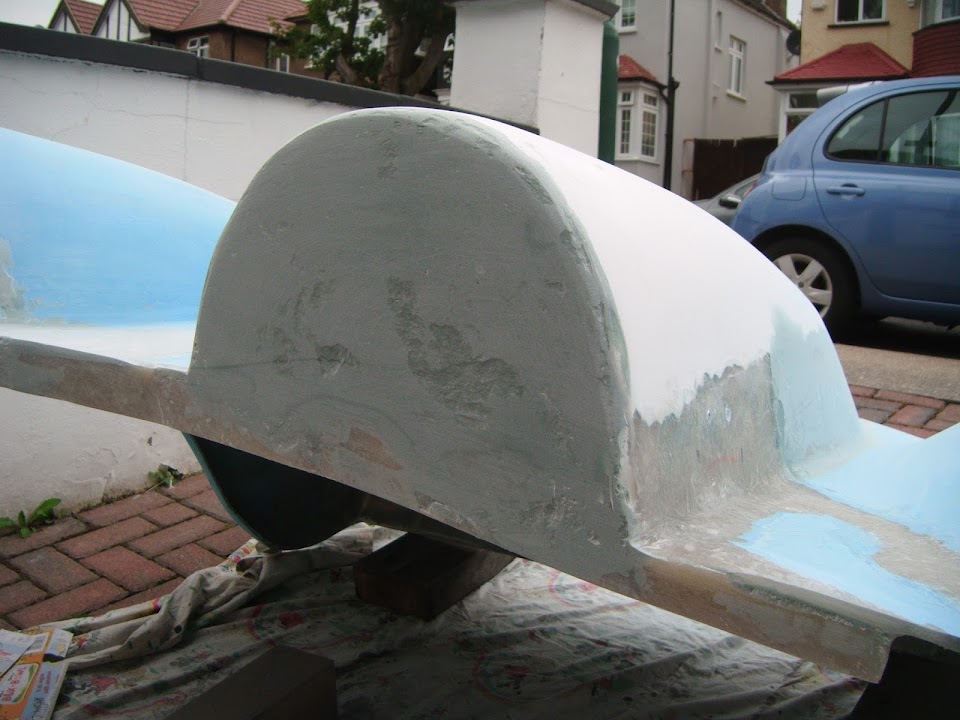
But I'll worry about that another day, in the meantime, here is a view of the humps taken under the scuttle.
End of Part 1...
|
28th August 2014, 16:40
|
|
Senior Member
|
|
Join Date: Feb 2012
Location: Wembley, London
Posts: 5,058
|
|
More Small Steps - Part 2:
With my wife's help, the body shell went back on the frame so I could mark up the driver's side of the cockpit again.

A quick session with the jigsaw left me with this.

Just before making the cut I took a photo of how the the rear cockpit edge looks now.

This is close enough to a straight line for me and it looks much better than when I started.
I abandoned the next job which was to start building up the rear cockpit lip around the newly cut corner on the driver's side.
As by now, the sky was looking like this ( AGAIN! ).

I was on the last stages of tidying everything away when the heaven's opened and I got a bit wet.
Project Status:
The good news is that the body shell is really starting to take shape now.
The bad news is that as everything thing takes so long, that I have no idea when I will ever finish this build.
However, the "glass half full" view is that at least I know now that one day I will finish it.
Without wishing to tempt fate, I think all the really big problems have been overcome.
So I will stick with my chipping away approach and see where I get before the winter sets in.
Until next time, take care, Paul.
|
30th August 2014, 07:12
|
 |
Senior Member
|
|
Join Date: May 2011
Location: Somerset
Posts: 1,671
|
|
Looking good matey!!
I must admit that when it was raining the other day i thought "shall i go into the garage and potter with the Miglia" and then i thought about what you're doing and that you'd kill for a garage to work in. So i MTFU and got on with it Cheers! |
|
Currently Active Users Viewing This Thread: 12 (0 members and 12 guests)
|
|
|
 Posting Rules
|
You may not post new threads
You may not post replies
You may not post attachments
You may not edit your posts
HTML code is Off
|
|
|
All times are GMT +0. The time now is 18:01.
|


 Hybrid Mode
