|
|
| Old No.7 Builds 275 kits from Dan |

5th November 2018, 07:31
|
|
Senior Member
|
|
Join Date: Aug 2017
Location: Auckland, New Zealand
Posts: 309
|
|
 Electrical Extensions completed front end
Well managed to squeeze a few hrs in after work and managed to get the R/H electrical looms in and bracketed. Same as the L/H side used ally fabricated into a bracket and fixed to two screw locations on the bulkhead as well as using one of the captive screws on the "E Box" on the R/H side by the brake master cylinder. Nice and tidy and hopefully out of the way of the clam when I get to put that on. Just a bit of final clipping and permanent labelling left to do.
Roll cage is finally installed and ain't coming out again! Need to tidy around the tubes, fix with custom sized bolts at the rear end and @ chassis tubes to tidy up the locking/finish.
R/H Disconnects and bracket:
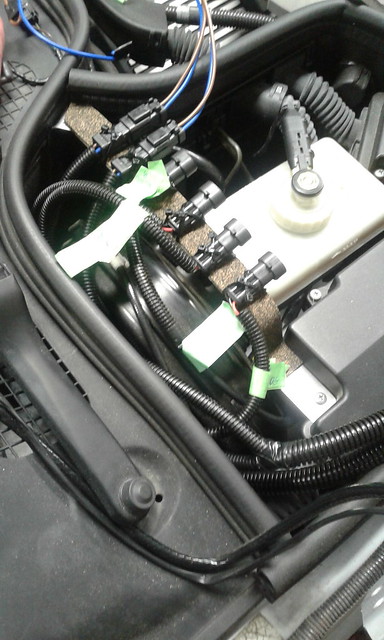 RH Disconnect bracket RH Disconnect bracket
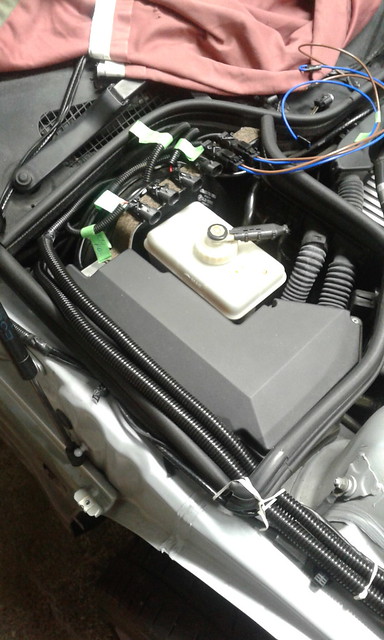 RH Electrical RH Electrical
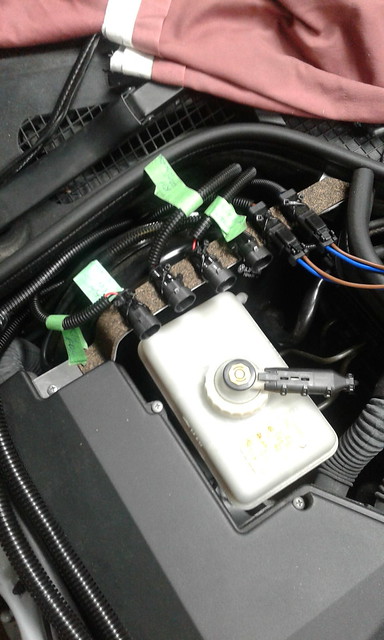 RH Quick disconnect RH Quick disconnect
Rollcage Installed:
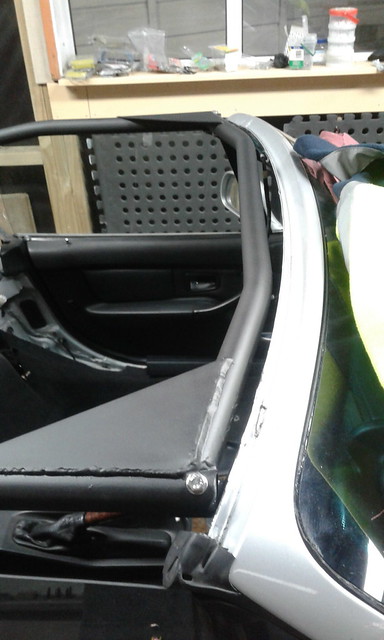 Roll cage installed 1 Roll cage installed 1
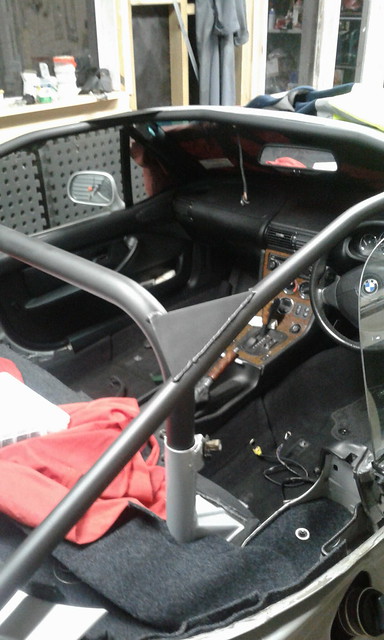 Roll cage installed Roll cage installed |
5th November 2018, 10:35
|
 |
Senior Member
|
|
Join Date: Apr 2016
Location: Camberley
Posts: 972
|
|
Great, well done, you just have to keep going now.
|
8th November 2018, 07:39
|
|
Senior Member
|
|
Join Date: Aug 2017
Location: Auckland, New Zealand
Posts: 309
|
|
Cheers Barber, will do my best!
For any kiwi based followers, have worked thru the LVV side of things as far as the seatbelts. New belts required but as the BMW belts are spec’d at approx 75 degrees and 105 degrees then webgrabbers can’t be fitted as they don’t make them to that spec. So normal new inertial reel belts and stalks are being fitted as per allowed.
This is due to the airbag coming out and the head impact zonal requirements with the coupe roof cage..
The LVV side is working out ok, a few little bits to consider or do differently from what is allowed/able to do in the UK, but nothing too scary. Just takes a bit more time and efforts that’s all.
Last edited by Welshkiwi; 8th November 2018 at 07:41..
|
11th November 2018, 04:07
|
|
Senior Member
|
|
Join Date: Aug 2017
Location: Auckland, New Zealand
Posts: 309
|
|
 Front end initial fit
Hey guys, a bit of progress today, but i keep getting caught out in the timescale of doing things! Mind you I spend too much time admiring and planning than doing actual stuff at times, I'll learn!
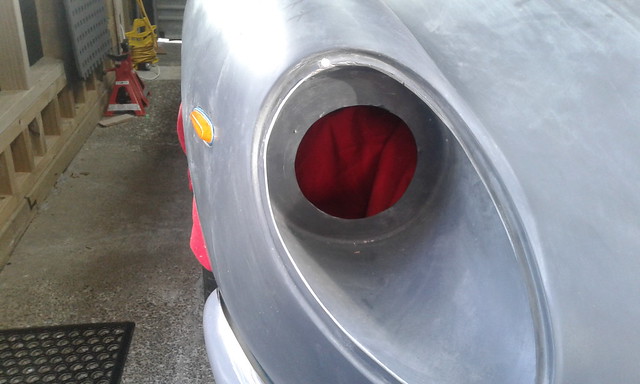
The front end is on and generally all good. I am going to have to play a bit as I have a height difference between left and right hand sides/wheel arches etc but once I get the bonnet catches sorted we'll see what I have. Hoping not a major to align all that up. You may see below a bit more gap on the L/H side at present. Approx 30mm.
I have already got the bonnet stuck about three times so far and at present definitely a two person job to release and raise. Bonnet lines out of the mould are pretty good. Some small work needed on the left side as there is a small "wave" in the line coming down the bonnet/over the wheel arch, nothing too major just final fettling stuff before paint etc.
Side Indicators will need to be stripped and rebuilt with longer retention bolts - Too short to go through the clam fibreglass suitably.
Bumper trimming needs to be done a bit but plenty of work to do before then. - They look real good though with the front end shape.
Sorted the SRS system, just need to make a Passenger occupancy sensor bypass tomorrow (2x100 Ohm resistors and a 1N4001 or subsitute diode) once is put in and reset I should be clear of the pre-tensioners and buckles/occupancy. Just need to ballast the airbags at a later date.
 Front end clam Front end clam
 Clam up Clam up
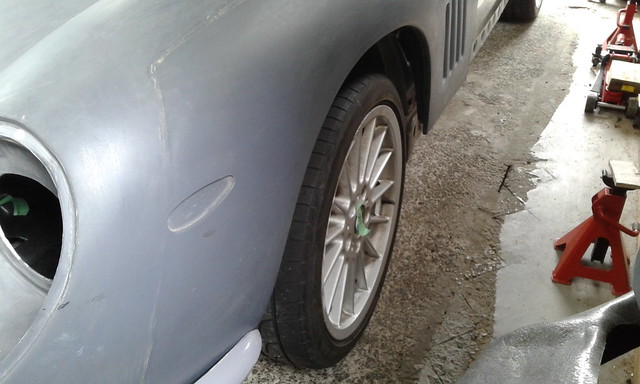 LH wheel gap LH wheel gap
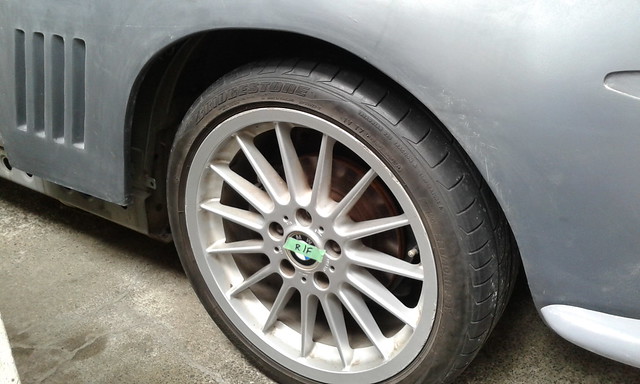 RH Wheel gap RH Wheel gap
Last edited by Welshkiwi; 11th November 2018 at 04:22..
|
11th November 2018, 09:04
|
|
Member
|
|
Join Date: Oct 2017
Location: Cornwall
Posts: 69
|
|
That does look good
|
11th November 2018, 11:12
|
|
Senior Member
|
|
Join Date: Aug 2012
Posts: 2,144
|
|
Looks good! The front end moulding in one piece looks better than the split front like on Kidge's car. The frenched in side lights in the moulding also a big plus to get the right look. Are those the GRP quarter bumpers you have fitted ?
|
11th November 2018, 15:26
|
|
Senior Member
|
|
Join Date: Aug 2017
Location: Auckland, New Zealand
Posts: 309
|
|
Quote:
Originally Posted by Lucky@LeMans

Looks good! The front end moulding in one piece looks better than the split front like on Kidge's car. The frenched in side lights in the moulding also a big plus to get the right look. Are those the GRP quarter bumpers you have fitted ?
|
Cheers guys, yup the grp quarters are what Chris/Dan did for me with the kit. Nicely done with their own integral bracket. I will do a bit of reprofiling in a few areas, paint the underside etc and get them chrome vinyl wrapped. They should look pretty sharp then and able to be re-covered if they get chips/damage. Also really happy with the indicators/look just got to get them installed with better retention. Cheers. |
12th November 2018, 06:02
|
|
Senior Member
|
|
Join Date: Aug 2017
Location: Auckland, New Zealand
Posts: 309
|
|
 SRS System sorted - Info for future
Hi guys,
The following is the normal safety caveat - I am only disabling my SRS system as I am allowed to by LVV and the fact that new seatbelts are being fitted. I am not condoning tampering or working on the SRS system for any purposes other than documenting what has been done on my car so my memory can be accessed down the track.
Made up the passenger occupancy bypass sensor to allow the SRS system to believe that someone is sat in the seat - This then stops the sensor sending a fault message for being unplugged. So I have successfully bypassed:
Drivers side seat belt loom - 100 Ohm resistor which simulates seatbelt buckled. (across outside pins)
Drivers side pretensioner squib - 3.3 Ohm resistor which simulates the squib. (Across two pins)
Passenger side pretensioner squib - Again 3.3 Ohm resistor (Across two pins)
Passenger side occupancy sensor - 2x100 Ohm resistors and 1x 1N4004 diode in series (Silver diode band to blue seat control box unit lead) - Simulates someone sat in the seat which activates the Passenger airbag and stops a fault code for SBE01.
Just for your info your passenger side buckled sensor is not plugged in. I imagine that this is a throw back from L/H drive or R/H drive cars and the loom is swapped sides in the car depending on country of required usage. (Drivers seat active from buckled sensor, passenger side from occupancy sensor)
This above info can help if you have a fault message and you are trying to identify if it is the loom or a component faulty. You will need a fault reset tool though as they stay "latched/hard locked in"
So I am now clear to be able to tidy the looms, refit the seats and carry on with the internals......
Also mocked up the R/H indicator tonight - see below.
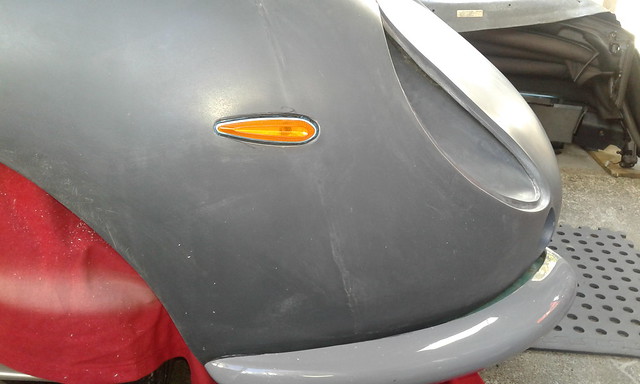 RH side indicator mock up RH side indicator mock up
 RH Side indicator mockup 1 RH Side indicator mockup 1

|
18th November 2018, 06:21
|
 |
Senior Member
|
|
Join Date: Feb 2012
Location: Wembley, London
Posts: 5,058
|
|
WelshKiwi – Looks like you are making good progress. 
I’m also sure that even seeing something as small as the side indicator in place helps with motivation.
Good luck, Paul. 
|
18th November 2018, 08:01
|
|
Senior Member
|
|
Join Date: Aug 2017
Location: Auckland, New Zealand
Posts: 309
|
|
Quote:
Originally Posted by Paul L
WelshKiwi – Looks like you are making good progress.
I’m also sure that even seeing something as small as the side indicator in place helps with motivation.
Good luck, Paul.
|
Cheers Paul, appreciate it. Feeling well motivated at the moment but a slow week this week, my boys cricket and my daughters dance show have derailed the flow, but that is life! Hoping for a bit more over the next week or two.....  |
23rd November 2018, 09:16
|
|
Senior Member
|
|
Join Date: Jul 2014
Location: Herts
Posts: 148
|
|
Bodily beginnings
Good to see 'MY' bumpers being used, did Chris say that royalties would follow . . .
The side repeaters look fine, I sealed them with some soft butyl and had enough bolt length to fit well. They are certainly an item of beauty.
Is the panel base for the front indicators facing straight forward ?
We fitted some uprated bonnet struts, but it is tricky with a lack of space. Really need even more force to hold the bonnet up.
Lovely to witness your progress.
|
24th November 2018, 01:58
|
|
Senior Member
|
|
Join Date: Aug 2017
Location: Auckland, New Zealand
Posts: 309
|
|
Quote:
Originally Posted by Egdik
Good to see 'MY' bumpers being used, did Chris say that royalties would follow . . .
The side repeaters look fine, I sealed them with some soft butyl and had enough bolt length to fit well. They are certainly an item of beauty.
Is the panel base for the front indicators facing straight forward ?
We fitted some uprated bonnet struts, but it is tricky with a lack of space. Really need even more force to hold the bonnet up.
Lovely to witness your progress.
|
Hi Kidge, yeh sorry in respect to your bumpers/moulds taken from them. I was just made aware that you knew moulds were taken for future use and that they would be supplied with the kit I ordered. As far as royalities, tricky one.....you may have to squeeze a bit for those! 
The fwd indicator pods do have a slight sidewards face to them, not directly fwd facing. same as yours? Did you straighten yours?
Will be looking further into the bonnet struts to see if a local company can sort an up rated strut for me. Also need to upgrade the springs on the catches when all the lights are in so the bonnet “pops” and allows me a one man operation.
Thanks for the good wishes tho, mild progress at best but progress all the same.
|
6th January 2019, 21:27
|
|
Senior Member
Enthusiast
|
|
Join Date: Mar 2008
Posts: 225
|
|
Hey Welshkiwi, I'm in Auckland too. I hope you are taking advantage of the glorious weather to make progress on your project. Did you ever find boot hinges? They look suspiciously like a pair I have in my garage from a FIAT Dino Sider (also built by Pininfarina). I want mine for my own project but you could easily use them as a pattern to cast and then chrome some for your boot. Superformance used to stock the FIAT items at 75GBP but I see they are out of stock at the moment.
Best of luck
Ross (in Blockhouse Bay)
|
7th January 2019, 05:39
|
|
Senior Member
Enthusiast
|
|
Join Date: Mar 2008
Posts: 225
|
|
boot hinges
Do these look like the boot hinges for a 275 GTB?
IMG_5877.jpg
IMG_5878.jpg
IMG_5879.jpg
|
7th January 2019, 09:49
|
|
Senior Member
|
|
Join Date: Sep 2011
Location: Teesdale
Posts: 238
|
|
Quote:
Originally Posted by rossnzwpi
Do these look like the boot hinges for a 275 GTB?
|
Here are some for sale https://www.ital-spares.com/brand/fe...haniere-aussen
They do look like the ones you have but at 399 euros they are not cheap.

You could always go for internal hinges which some of the original cars had. |
7th January 2019, 19:59
|
|
Senior Member
|
|
Join Date: Aug 2012
Posts: 2,144
|
|
Have you looked at Morris Oxford boot hinges. Very similar design and readily available new for around £20 a pair.
Last edited by Lucky@LeMans; 7th January 2019 at 20:02..
|
7th January 2019, 20:03
|
|
Senior Member
|
|
Join Date: Aug 2012
Posts: 2,144
|
|
Here are the type I'm thinking about...
|
16th January 2019, 06:46
|
|
Senior Member
|
|
Join Date: Aug 2017
Location: Auckland, New Zealand
Posts: 309
|
|
Quote:
Originally Posted by rossnzwpi
Hey Welshkiwi, I'm in Auckland too. I hope you are taking advantage of the glorious weather to make progress on your project. Did you ever find boot hinges? They look suspiciously like a pair I have in my garage from a FIAT Dino Sider (also built by Pininfarina). I want mine for my own project but you could easily use them as a pattern to cast and then chrome some for your boot. Superformance used to stock the FIAT items at 75GBP but I see they are out of stock at the moment.
Best of luck
Ross (in Blockhouse Bay)
|
Hey Ross, apologies for the delayed reply, have been away on summer hols etc enjoying our sunshine! Really appreciate the info etc and the offer on the hinge possibilities, will certainly bear that in mind. I am in Howick for your info.
I currently have Morris Oxford hinges on the back, not sure whether they will be the finals as they needed a bit of fettling/tidying. The backend is still in the crate and hasn’t seen the light of day yet due to other things taking over so pretty poor progress so far. I have had health issues which means I am heading for surgery in the next few months, my boy has had health issues which has sucked a lot of other time but one day the priorities will change!
I have a lot of potential energy just waiting to turn kinetic. Steering wheel and boss ready to fit once tidied the electrical ballast. Seat belts arrived so ready to fit. Have got some 15” style 5 crosslace BMW alloys which I have trial fitted to the car. Could be an option with some 195/65/15 balloon rubber wrapped round them, need the panels fitted before I make final decision on that look.
Lots of wiring to run in front clam and rear section still and then going to start bonding for top of screen/front of roof.
Look forward to catching up sometime and thanks for the photos of your hinges, they look very similar and very nice! Cheers Mark.
|
18th January 2019, 05:01
|
|
Senior Member
|
|
Join Date: Aug 2017
Location: Auckland, New Zealand
Posts: 309
|
|
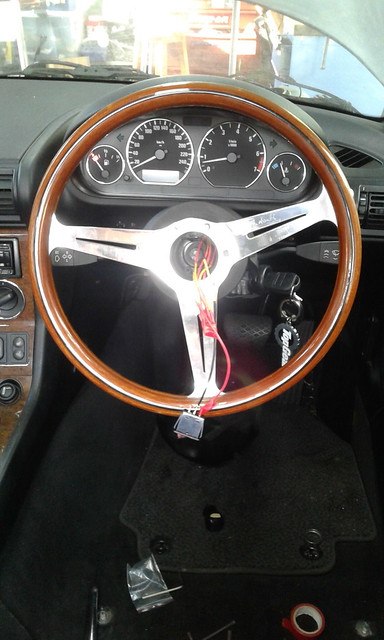
Progress and success - Steering Wheel
Stimulated by Hugh and his steering boss questions I have made some progress - Cheers fella!
Initial fitment of the Nardi Steering wheel, PCD spacer and OMP boss kit tonight.
Temporary fit of wheel due to need to change the clock spring fitment to three locations (need to modify the plastic support) and probably need to grind down the OEM original hub spacer washer as it is now too thick and with the face of the column being angled it will be needed to be fitted.
Jacked the front up and steering lock and indicator cancelling all works. Even temporary rigged a rocker switch and the horn works ok so I know now the clock spring is good.
Had the car running as you can see below with no lights - ABS light comes on with ignition, self checks and goes out so happy days! Double stage wheel airbag needed two 3.3 Ohm resistors for that. (As well as the previous SRS work I listed before)
 Nardi Wheel 1 Nardi Wheel 1
 Boss Adaptor and OMP Boss Boss Adaptor and OMP Boss
 Wheel Wiring Initial double ballast Wheel Wiring Initial double ballast
 Running - No Lights Running - No Lights |
19th January 2019, 00:21
|
|
Senior Member
|
|
Join Date: Aug 2017
Location: Auckland, New Zealand
Posts: 309
|
|
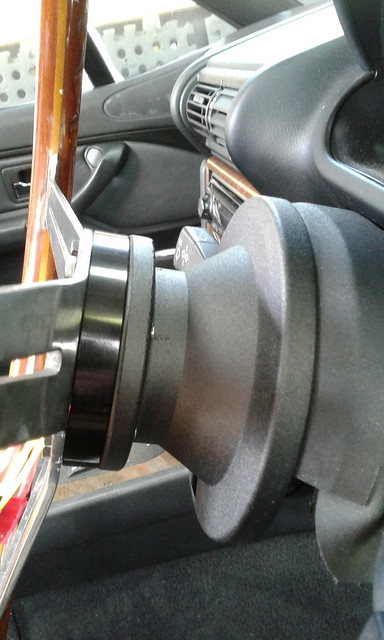
Clock spring modification - Steering wheel fit
Managed to complete the fit of the steering wheel today as well as route the rear brake light high level harness, fit the seatbelts (new for LVV cert) as well as 95% complete the rear parcel shelf (some carpet covers to make up for the vertical roll cage supports/belt areas). Also prepped the top of the front screen ready for bonding on the support for the front of the roof.
The steering wheel clock spring had to be modified as the holes in the OMP boss were not quite the right PCD and only one hole would align at anyone time. So to fit the three screws I slotted the plastic supports, managed to fit all three screws snug and tight and threadlocked for security. The steering column washer/spacer had to be re-sized, it mic'd up at 10.3mm but to match where the original M series OEM wheel was positioned it needed to be 8.3mm approx. Got the file out and the wet/dry etc and it worked a treat. Just need to fit the horn button now, waiting for my order on E-bay to arrive, gone for a Pininfarina logo button.
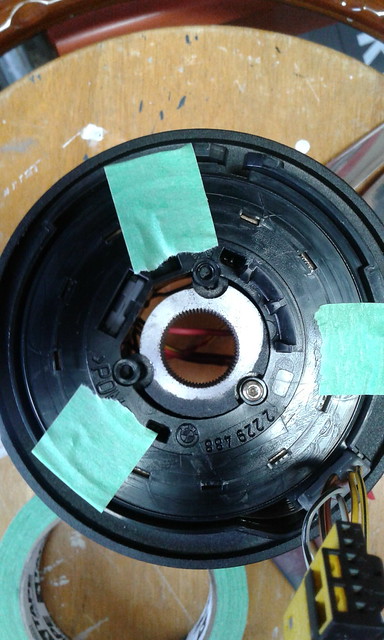 Clock spring - unmodified Clock spring - unmodified
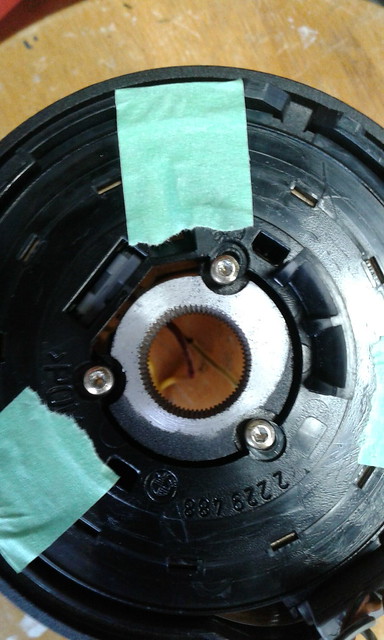 Clock spring - modified Clock spring - modified
|
|
Currently Active Users Viewing This Thread: 11793 (0 members and 11793 guests)
|
|
|
 Posting Rules
|
You may not post new threads
You may not post replies
You may not post attachments
You may not edit your posts
HTML code is Off
|
|
|
All times are GMT +0. The time now is 04:35.
|


 Hybrid Mode
