|
|
| Vintage and Classic Roadster Kit Car Builds For Vintage and Classic era kit cars. Post your build reports, problems and progress here |

24th September 2023, 14:11
|
|
Senior Member
|
|
Join Date: Aug 2012
Posts: 2,144
|
|
Quote:
Originally Posted by Mick O'Malley

The programme reads: No.78 Richard Wilson Maserati 250S 2490cc 1957 Red. If you went for the Tribute, what underpinnings would you go for?
|
A bit of googling and it does appear to be an original !
As for a base car the Maserati has a narrow track and short wheelbase so it lends itself towards a "7" style chassis. Some of engines they used were 4 cylinder twin cams like the Fiat / Lancia / Lotus designs with twin side draught carbs. So a replica under bonnet area could be created too ! |
1st October 2023, 09:31
|
|
Senior Member
|
|
Join Date: Nov 2012
Posts: 845
|
|
 Matching Switches - ish.
A few days ago, when weather permitted, I swapped the tacky plastic switch for the 'Repro Lucas' item I'd bought on Ebay. It has a galvanised looking finish, unlike the chrome original, and the mechanism behind is encased in a soft plastic shell rather than the hard black plastic of the Lucas item. Only time will reveal if it will A) tarnish and/or B) fail early. I'll keep looking for an original on Ebay.

It's the one to the right of the indicator gubbins.
Having fitted the electric fan, I began wondering about the thermostat as I couldn't recall having fitted a new one - a trawl through this blog proving fruitless. There was one fitted, which I removed for testing - it was a dud, refusing to open in a pan of boiling water. Not a lot of good. I ordered a new one c/w gasket and cleaned the mating surfaces of its housing and the top of the water pump. Once it arrived I fitted it, fired her up, and watched in dismay the resulting mini Niagara  . I think the problem was the tissue thin gasket. Anyway, I've ordered a couple of new ones and some likely looking gasket goo, having not found a supplier of my reliable six decade standby, Red Hermatite. If all goes well I shall take her to Prescott next Saturday. . I think the problem was the tissue thin gasket. Anyway, I've ordered a couple of new ones and some likely looking gasket goo, having not found a supplier of my reliable six decade standby, Red Hermatite. If all goes well I shall take her to Prescott next Saturday.
Regards, Mick

|
5th October 2023, 10:28
|
|
Senior Member
|
|
Join Date: Nov 2012
Posts: 845
|
|
Quote:
Originally Posted by Mick O'Malley
|
After posting the above last Sunday, I decided that the very distressed volt meter was rather spoiling the overall effect, so I hit Ebay searching for used same. After ploughing through the plethora of mis-advertised ammeters  I found a nicely presented Tudor branded one BIN at a reasonable price which was delivered, very well packed, yesterday. I found a nicely presented Tudor branded one BIN at a reasonable price which was delivered, very well packed, yesterday.
Not having been successful two days running in using the instant gasket installing the new thermostat - ham-fisted, moi? I set to releasing the LH end of the dash, wedging it open with a block of wood to marginally improve the meagre access, having first disconnected the battery's earth. Despite removing the recently installed switch just above it, I couldn't get enough purchase on the gnurled nut holding it on. OK, remove the fuel gauge immediately below for a try that way. Having done that, which was a struggle in itself, I was just about able to access the nut with long nosed pliers - a squirt of WD40 and lots of cursing and it was off. Having put its replacement in I remembered that a nicer fuel gauge had come with the Phaeton so I dug that out of my box of clocks and substituted it. Reinstating the dash and re-connecting the battery I was delighted, if not amazed, that they both worked a treat. A hat trick of successes was achieved as I'd spotted a dodgy connection in one of the tacho. wires and remade it so said clock now works consistently  . No picture as yet. . No picture as yet.
Today it's back to the thermostat housing problem. Third time lucky? Maybe.
Regards, Mick
Last edited by Mick O'Malley; 4th January 2024 at 07:26..
Reason: Spelling.
|
5th October 2023, 15:08
|
|
Senior Member
|
|
Join Date: Nov 2012
Posts: 845
|
|
D'Oh!
This afternoon I had another crack at fitting the thermostat housing. Once it was off I began removing all the instant gasket which was stuck like the proverbial to a blanket, first from the housing, then the top of the water pump. It's held in place by two screws, one of which is much longer than the other. I noticed that there was water from yesterday in the longer tapped hole so stuck a screwdriver in to clear the mystery blockage. Not possible, as the sheared remains of the 55 year old screw were stuck halfway down the tapping. I ground a little off the end of the broken screw and fitted it with a plain washer so that it wouldn't bottom in its hole: I think this was probably the fly in the ointment. I also ran a die down it and its oppo as they were fairly rusty. I again cleaned both the mating surfaces with acetone before applying the instant gasket, waited the recommended ten minutes for it to skin over, and reassembled. According to the blurb it takes 24 hours to fully cure, so I won't top up the rad and fire her up until tomorrow. Fingers crossed.
Here's the dash with its replacement clocks, looking much better IMO.

Regards, Mick
|
7th October 2023, 17:42
|
|
Senior Member
|
|
Join Date: Nov 2012
Posts: 845
|
|
 3rd time lucky.
Yesterday I uncovered the beast and, in true pessimist fashion, topped up the rad. and fired her up. Bingo, not the tiniest trace of leakage. However, there was vapour floating up from the exhaust manifold. I first assumed this was carelessly spilled water soaked into the exhaust wrap and boiling off. No! A quick sniff indicated oil. Aaaaaaaaagh! So, out with the home made ramps kindly donated by my Polish ex-neighbour when he quit the UK.

Worming underneath with a wander light revealed damning evidence of a leak, but from where? I first checked the sump bolts and got a hit: they all needed at least a quarter turn, so I'm guessing that the gasket had shrunk over the years (decades?) of inactivity. Rolling back to earth and the smoke had vanished. Result!
Today's imagined sortie in her failed to materialise as my daughter had inadvertently boxed me in, her mind being elsewhere yesterday, and I didn't want to harass her at stupid o'clock. So, off to Prescott in the tin top. I'd not got far when I fell in behind this top-down Mk1 Sprite which I followed all the way to the venue, the pilot turning out to be a competitor.

There was the usual fabulous assortment in the paddock, which included, to my eye, some real gems. Chief amongst them was this glorious Allard J2 powered by a 3917cc flathead V8 with an overhead inlet valve conversion.

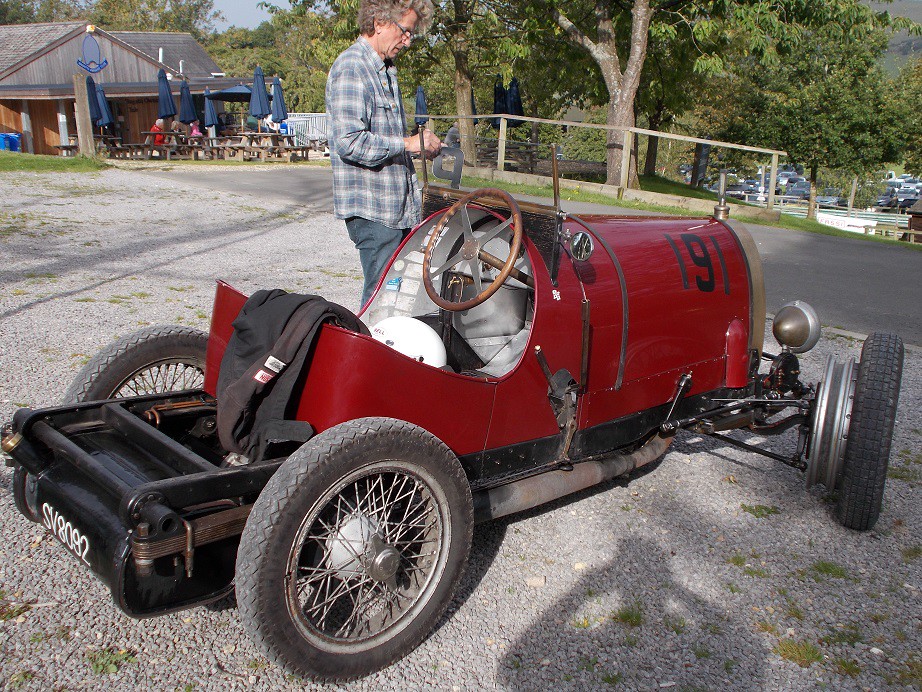
Next was this 1920 Bugatti with a novel front track modification.
Last but by no means least was this 1380cc A series powered A40.

All in all a brilliant day out to round off this year's accessible speed hill climb season. Roll on 2024!
Regards, Mick
Last edited by Mick O'Malley; 11th October 2023 at 05:11..
Reason: Typo.
|
11th October 2023, 14:11
|
|
Senior Member
|
|
Join Date: Nov 2012
Posts: 845
|
|
 Tonneau Tidying
Having worked out, at long last, a workable partial solution to my Phaeton's imagined engine mountings, I ordered some box section ally which I hoped would arrive today. No such luck! So, I turned my attention to trimming the Monaco's tonneau cover. I'd originally intended to edge it with the special tape in black but a trial run with an off-cut of the double duck, also black, with black thread had my eyes popping out, despite brightly illuminating the work area with the Anglepoise lamp. Thinking back to the A352's tonneau, I decided on body colour matching trim. The trim has to be folded over the edge of the fabric and held in position whilst sewing, tricky to say the least, so I decided to iron it folded first. My second hand sewing machine had always been a bit jerky, despite my having given it a good clean and lube overhaul on purchase. I realised this morning that I'd not done the same with the accelerator pedal. Opening it up revealed ancient fluff and light corrosion on the rheostat, the latter responding well to contact cleaner. A spot of oil on the hinge and its operation (tested power off) was way smoother. Result!
I then remembered that I'd fitted the 'lift the dot' gubbins after my now departed Stateside seamstress friend had edged my A352 tonneau for me. The fasteners would need to be removed from three sides of each half to be double sure that needle breakage was avoided. However, the long centre edges of each half had sufficient overlap meat for me to make a start on one edge.

Taking it very steady with the now super smooth machine saw me completing my first attempt with reasonably tidy success. Once the metal fasteners are off (there are 28, each with four tabs to be bent up!) I can both do the rest of the edge and work out how to make tidy corner joins.
Regards, Mick
|
|
Currently Active Users Viewing This Thread: 154 (0 members and 154 guests)
|
|
|
 Posting Rules
|
You may not post new threads
You may not post replies
You may not post attachments
You may not edit your posts
HTML code is Off
|
|
|
All times are GMT +0. The time now is 16:43.
|


 Hybrid Mode
